
What if you could talk to your computer and have it perform tasks through the Bash terminal, without you writing a single command? With NVIDIA Nemotron Nano v2, you can easily build a natural language Bash agent from scratch, in under an hour, and with roughly 200 lines of Python code with minimal dependencies.
This post will walk you through the core components and considerations step-by-step, so you can easily follow along. First, we’ll build everything from scratch. Then, as a bonus, the blog will show how LangGraph can simplify the design further.
Let’s dive in.
Quick links to the model and code
What are the prerequisites?
- NVIDIA Nemotron Nano 9B v2 (deployed locally or in the cloud)
- Local deployment requires:
- ~20GB of disk spaceAn NVIDIA GPU with at least 24GB of VRAM
What you’ll get in the end: a computer use agent
Here is an actual interaction that you can expect from the agent you’ll build from this tutorial:
['/home/sandbox' 🙂] Make a new directory called "system-info," then create a file called "info.txt" and populate it with current system config (disk space, memory), then briefly summarize the contents. ▶️ Execute 'mkdir system-info'? [y/N]: y ▶️ Execute 'touch system-info/info.txt'? [y/N]: y ▶️ Execute 'df -h >> system-info/info.txt'? [y/N]: y ▶️ Execute 'free -h >> system-info/info.txt'? [y/N]: y ▶️ Execute 'cat system-info/info.txt'? [y/N]: y[🤖] Here's a summary of the system information in `system-info/info.txt`:**Disk Space** - Total: 984 GB (`overlay`), 2.6 TB (`/home/sandbox`) - Used: ~518 GB (56%) on `/`, ~2.1 TB (83%) on `/home/sandbox` - Available: ~416 GB (42%) on `/`, ~432 GB (17%) on `/home/sandbox` **Memory** - Total: 62 GB RAM - Used: 20 GB - Free: 14 GB - Swap: 63 GB available (0 GB used) Let me know if you'd like to refine this further.Legend: 🙂: User message 🤖: Agent response ▶️: Command execution confirmation
Going from chatbots to AI agents
Unlike chatbots that respond in a request-and-reply fashion, AI agents are systems that take high-level goals as the input, then autonomously reason, plan, and execute tasks to achieve those goals. A key enabler for this process is tool calling (a.k.a. function calling): instead of just replying with text, the agent can invoke external tools or APIs to actually carry out actions, determine their outcomes, and plan for the next steps.
The Bash computer use agent we are building is a clear example of an agent: You provide a high-level instruction, and it decides which Bash commands to run via tool calling to carry out the instruction. This agent is small enough to build in from scratch around 200 lines of code, yet it illustrates the same fundamental principles behind far more advanced agents.
At the core of every modern agent is a large language model (LLM) capable of reasoning about user intent and translating it into concrete actions. This LLM must be efficient, responsive, and have excellent reasoning skills so it can achieve complex goals. That’s exactly what NVIDIA Nemotron Nano 9B v2 delivers: a compact model with strong reasoning ability that runs quickly to keep interactions snappy, while maintaining a simple setup. These characteristics make it an excellent fit for lightweight agents like the one we are building here.
If you’re just getting started and want a primer on the four main components of an AI agent, please check out this blog.
What are the key considerations?
Let’s start by reviewing the key considerations for building our agent:
- Bash use via tool calls: We need to expose the Bash CLI as a tool to the agent, so it can execute commands and receive outputs (such as success or failure, as well as any outputs from the command). We also need to keep track of the active working directory. This is important because the agent needs to navigate around the filesystem, and must be able to run each Bash command from the correct directory.Command safety: We must prevent our agent from running unsafe or destructive commands. To address this, we enforce an allowed list of commands like
ls, cat, and grep, ensuring the agent only operates within a safe, predictable scope. Additionally, we introduce a confirmation step: Before executing any command, the user is prompted to approve it. This human-in-the-loop pattern gives the user full control over what actually runs in the terminal.Error handling: To build reliable agentic systems, we must always account for failure cases. For our Bash agent, commands can fail due to invalid syntax, missing files, or unexpected outputs. The agent should catch these errors, interpret them, and choose the right next step.What are the system components?
With the considerations in place, the architecture becomes very simple. The system has two main components:
- The Bash class: a lightweight wrapper around Python’s
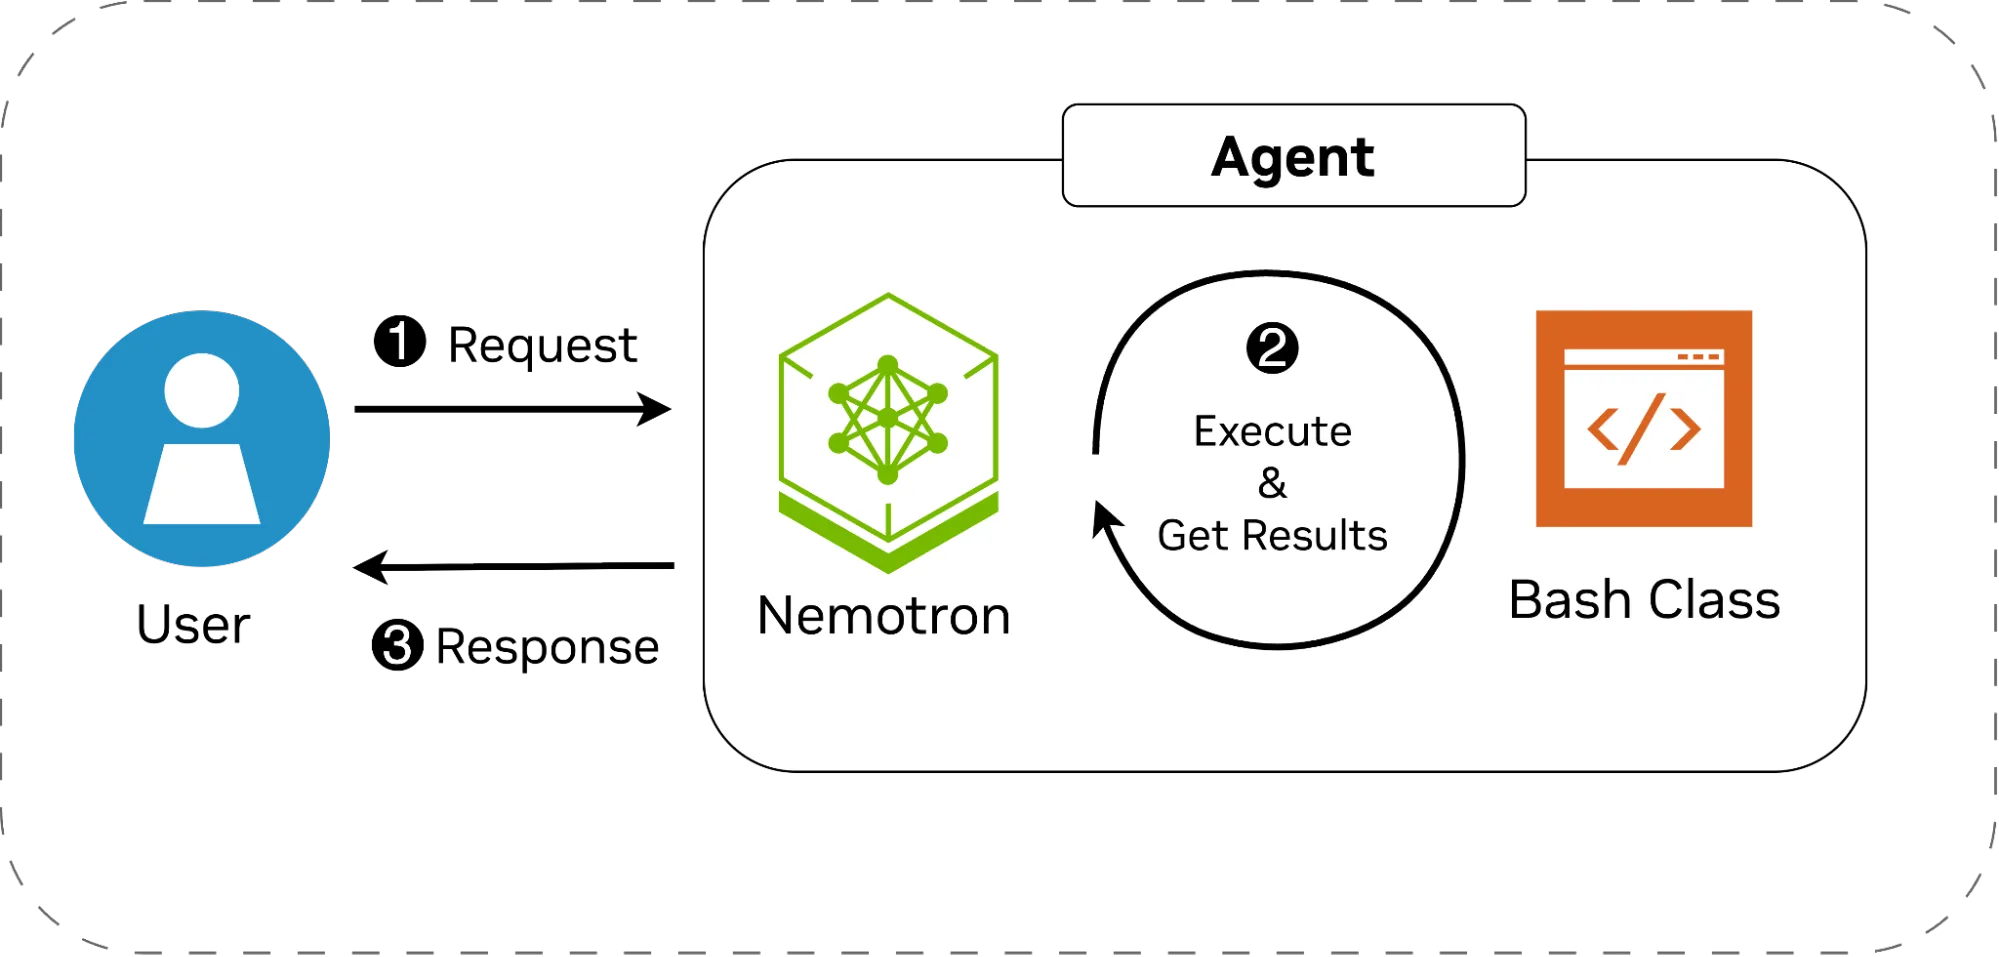
subprocess module that manages the working directory, enforces the command allowlist, executes commands, and returns the execution results (or errors) back to the agent.The agent: uses the NVIDIA Nemotron model to understand user intent and decide how to act, while maintaining context across turns. The agent’s behavior is guided by a carefully crafted system prompt that sets boundaries, defines its role as a Bash assistant, and reminds it of the allowed commands. The figure below depicts the architecture diagram of the system. The workflow is as follows:
- The user issues a high-level instruction, such as changing directories, copying files, or inspecting document contents.Nemotron interprets the request, breaks it into concrete steps, and uses the Bash class when command execution is needed. Some tasks may require no execution at all, while others may span multiple commands. After each run, the model receives the output and decides the next step or when to stop.Once the task is complete, whether successful or halted by an error, the agent returns the result to the user and waits for the next instruction.
We’ll first implement both components from scratch, then this blog will walk you through wiring them up with LangGraph to further simplify the setup.
The Bash class
We create a simple class that stores the list of allowed commands, as well as the current working directory. See below for a summarized snippet of this class.
class Bash: """ An implementation of a tool that executes Bash commands """ def __init__(self, cwd: str, allowed_commands: List[str]): self.cwd = cwd # The current working directory self._allowed_commands = allowed_commands # Allowed commands def exec_bash_command(self, cmd: str) -> Dict[str, str]: """ Execute the bash command after getting confirmation from the user """ if cmd: # Check the allowlist allowed = True for cmd_part in self._extract_commands(cmd): if cmd_part not in self._allowed_commands: allowed = False break if not allowed: return {"error": "Parts of this command were not in the allowlist."} return self._run_bash_command(cmd) return {"error": "No command was provided"} def to_json_schema(self) -> Dict[str, Any]: """ Convert the function signature to a JSON schema for LLM tool calling. """ return { "type": "function", "function": { "name": "exec_bash_command", "description": "Execute a bash command and return stdout/stderr and the working directory", "parameters": { "type": "object", "properties": { "cmd": { "type": "string", "description": "The bash command to execute" } }, "required": ["cmd"], }, }, } def _run_bash_command(self, cmd: str) -> Dict[str, str]: """ Runs the bash command and catches exceptions (if any). """ stdout = "" stderr = "" new_cwd = self.cwd try: # Wrap the command so we can keep track of the working directory. wrapped = f"{cmd};echo __END__;pwd" result = subprocess.run( wrapped, shell=True, cwd=self.cwd, capture_output=True, text=True, executable="/bin/bash" ) stderr = result.stderr # Find the separator marker split = result.stdout.split("__END__") stdout = split[0].strip() # If no output/error at all, inform that the call was successful. if not stdout and not stderr: stdout = "Command executed successfully, without any output." # Get the new working directory, and change it new_cwd = split[-1].strip() self.cwd = new_cwd except Exception as e: stdout = "" stderr = str(e) return {"stdout": stdout, "stderr": stderr, "cwd": new_cwd}This class exposes two public functions:
exec_bash_command(cmd: str) -> Dict[str, str], which the agent can call to execute commands. It returns a dictionary with stdout, stderr, and the updated working directory, or an error if the command is invalid or not allowed. These signals let the agent adapt when something goes wrong.to_json_schema(self) -> Dict[str, Any] , which is used for telling the LLM how to use this tool (LangGraph doesn’t need this).Before execution, the function checks the command against the allowlist. Execution is handled inside the private function _run_bash_command(), which internally calls Python’s subprocess.run(). There are exception handling blocks to properly deal with all failure cases. To track directory changes (such as when the agent uses the cd command), we append a unique text marker and pwd to every command. After execution, we locate the marker in the output, extract the new working directory, and update the tool’s state before returning the execution results, along with the active working directory to the agent.
The agent
For the agent, we initialize Nemotron as the reasoning engine and register exec_bash_command() as a callable tool for command execution. The model’s behavior is shaped by a system prompt (shown below) that defines its role as a Bash assistant, lists the allowed commands, and guides when and how it should assist the user or invoke tool calls. While our Bash class enforces the allowlist, the prompt reinforces this rule, which is a good practice to keep the model aligned. The prompt also uses the /think flag to enable thinking mode, improving the model’s reasoning.
SYSTEM_PROMPT = f"""/thinkYou are a helpful Bash assistant with the ability to execute commands in the shell.You engage with users to help answer questions about bash commands, or execute their intent.If user intent is unclear, keep engaging with them to figure out what they need and how to best helpthem. If they ask question that are not relevant to bash or computer use, decline to answer.When a command is executed, you will be given the output from that command and any errors. Based onthat, either take further actions or yield control to the user.The bash interpreter's output and current working directory will be given to you every time acommand is executed. Take that into account for the next conversation.If there was an error during execution, tell the user what that error was exactly.You are only allowed to execute the following commands:{LIST_OF_ALLOWED_COMMANDS}**Never** attempt to execute a command not in this list. **Never** attempt to execute dangerous commandslike `rm`, `mv`, `rmdir`, `sudo`, etc. If the user asks you to do so, politely refuse.When you switch to new directories, always list files so you can get more context."""The agent loop (made from scratch)
Building the agent loop is straightforward. We initialize the OpenAI client and keep a history of conversation turns, acting as our memory/state. Inside the loop:
- Take user input and send it to the model with the system prompt.Get and store the model’s response in conversation history, then check for tool calls:
- If a tool call is present, confirm execution with the user. On approval, run
exec_bash_command(), return the result, and get the next response; otherwise, inform the model.If no tool call is present, display the model’s reply and return control to the user.To keep our code nice and tidy, let’s define abstractions for storing the conversation history (the Messages class), as well as using the client to send requests to the model and get the responses (the LLM class). With these abstractions in place, the entire agent loop becomes short and intuitive:
bash = Bash(...)# The modelllm = LLM(...)# The conversation history, with the system promptmessages = Messages(SYSTEM_PROMPT)# The main agent loopwhile True: # Get user message. user = input(f"['🙂] ").strip() messages.add_user_message(user) # The tool-call/response loop while True: response, tool_calls = llm.query(messages, [bash.to_json_schema()]) # Add the response to the context messages.add_assistant_message(response) # Process tool calls if tool_calls: for tc in tool_calls: function_name = tc.function.name function_args = json.loads(tc.function.arguments) # Ensure it's calling the right tool if function_name != "exec_bash_command" or "cmd" not in function_args: tool_call_result = json.dumps({"error": "Incorrect tool or function argument"}) else: if confirm_execution("cmd"): tool_call_result = bash.exec_bash_command(function_args["cmd"]) else: tool_call_result = {"error": "The user declined the execution of this command."} messages.add_tool_message(tool_call_result, tc.id) else: # Display the assistant's message to the user (without the thinking part). print(f"\n[🤖] {response.strip()}") breakNote the inner while loop, which is needed because the agent might need multiple tool calls to accomplish its task. This corresponds to step No. 2 in Figure 1.
Bonus: the agent loop (using LangGraph)
With LangGraph, the agent loop becomes even simpler. Using create_react_agent() from this library, we can manage the loop, connect the model, tool, and conversation state, and let the library handle tool calls and result passing automatically. It also makes error handling more structured, letting the agent react to failures or retries within a controlled flow instead of manual checks. Like our from-scratch version, a system prompt defines the Bash assistant’s role and enforces safe command execution, while a small helper wraps bash.exec_bash_command() for human-in-the-loop confirmation. This minimal setup produces a fully functional agent that understands intent, invokes the right tool, and returns results interactively.
The summarized code snippet is as follows:
from langgraph.prebuilt import create_react_agentfrom langgraph.checkpoint.memory import InMemorySaverfrom langchain_openai import ChatOpenAIclass ExecOnConfirm: """ A wrapper around the Bash class to implement human-in-the-loop """ def __init__(self, bash: Bash): self.bash = bash def _confirm_execution(self, cmd: str) -> bool: """Ask the user whether the suggested command should be executed.""" return input(f" ▶️ Execute '{cmd}'? [y/N]: ").strip().lower() == "y" def exec_bash_command(self, cmd: str) -> Dict[str, str]: """Execute a bash command after confirming with the user.""" if self._confirm_execution(cmd): return self.bash.exec_bash_command(cmd) return {"error": "The user declined the execution of this command."}# Instantiate the Bash classbash = Bash(...)# Create the agentagent = create_react_agent( model=ChatOpenAI(model=...), tools=[ExecOnConfirm(bash).exec_bash_command], # Wrap for human-in-the-loop prompt=SYSTEM_PROMPT, checkpointer=InMemorySaver(),)# Create the user/agent interaction loopwhile True: user = input(f"[🙂] ").strip() # Run the agent's logic and get the response. result = agent.invoke({"messages": [{"role": "user", "content": user}]}, config=...) # Show the response (without the thinking part, if any) response = result["messages"][-1].content.strip() if "</think>" in response: response = response.split("</think>")[-1].strip() if response: print(f"\n[🤖] {response}")What are the next steps?
You’ve now built your own computer use agent with just a few lines of code. From here, experiment: Try adding your own commands, adjust the system prompt, and see how the agent adapts. Once you’ve explored a bit, you’ll notice the same principles extend naturally to more advanced multi-agent systems.
Join the conversation in the NVIDIA developer forum. We’re excited to see your experiments, hear your questions, and check out what you build next.
Stay up-to-date on NVIDIA Nemotron by subscribing to NVIDIA news and following NVIDIA AI on LinkedIn, X, Discord, and YouTube.
