
Scala stands out as a versatile programming language that combines object-oriented and functional programming approaches. By running on the Java Virtual Machine (JVM), it maintains seamless compatibility with Java libraries while offering a concise and scalable development experience. The language has distinguished itself in the realm of distributed computing and big data processing, with the Apache Spark framework, built using Scala, serving as a prime example of its capabilities. Though Amazon SageMaker Studio provides comprehensive support for Python-based data science and machine learning (ML) workflows, it doesn’t include built-in support for Scala development.
This integration is particularly valuable for those working with Spark or engaged in complex data processing tasks, because it supports seamless Scala-based exploratory analysis and development alongside Python-centric tools in Amazon SageMaker. The addition of the Almond kernel expands the versatility of SageMaker Studio, so teams can maintain their preferred Scala workflows while taking advantage of the service’s ML and cloud computing capabilities.
Organizations and teams working in mixed-language environments, particularly those heavily invested in Scala and Spark-based data processing workflows, face challenges when using SageMaker Studio because it doesn’t have built-in Scala support. The current process requires developers to maintain separate environments or use workarounds, disrupting workflows and reducing productivity. Data scientists and engineers who prefer Scala’s strong typing and functional programming must adapt to Python or switch platforms, increasing development overhead and risking inconsistencies in production pipelines. Furthermore, teams that have built extensive Scala code bases for their big data processing face additional complexity when trying to integrate their existing work with ML capabilities of SageMaker, which slow down the adoption of advanced ML features or require additional engineering effort to align their Scala-based data processing and Python-based ML workflows.
This post provides a comprehensive guide on integrating the Almond kernel into SageMaker Studio, offering a solution for Scala development within the platform.
Solution overview
The Almond kernel is an open source project that brings Scala support to Jupyter notebooks, effectively integrating Scala and interactive data analysis environments. The installation of the Almond kernel uses Coursier, a widely recommended Scala application installer and artifact manager. Coursier simplifies and automates the process of downloading, managing, and installing Scala libraries and dependencies. Its dependency resolution mechanism makes sure users have consistent and compatible library versions, significantly reducing potential conflicts and installation complexities. The installation steps using Coursier are executed within a custom Conda environment, maintaining a clear separation from the base SageMaker Studio setup.
By walking through the installation and configuration process, developers and data scientists can use Scala’s robust features directly within SageMaker Studio. The following sections provide a step-by-step process to set up Scala development in SageMaker Studio using the Almond kernel.
Prerequisites
To begin working with this project, you must have access to JupyterLab (version 2.4.1 or later) in SageMaker Studio. This requires an active AWS account with a SageMaker Studio domain configured and a user profile set up. To set up your domain, refer to Guide to getting set up with Amazon SageMaker AI. Familiarity with the Jupyter notebooks environment is beneficial, because you will be working extensively within this interface.
By default, SageMaker Studio provides a network interface that allows communication with the internet through a virtual private cloud (VPC) managed by Amazon SageMaker AI. Egress to the internet from SageMaker Studio is necessary for downloading necessary packages and accessing various resources. Be aware that corporate firewalls or network restrictions might interfere with your ability to download required packages. If you have deployed SageMaker Studio in a private subnet, refer to Connect Amazon SageMaker Studio in a VPC to External Resources for instructions on enabling egress access to internet.
Appropriate AWS Identity and Access Management (IAM) permissions are essential for launching and modifying SageMaker Studio environments. For SageMaker Studio setup, admin access is initially required to configure the environment; however, in production scenarios, it’s crucial to follow the principle of least privilege by granting only the minimum necessary IAM permissions to users and roles for their specific tasks within SageMaker Studio.
Create Jupyter Lab space in SageMaker Studio
For instructions to create a JupyterLab space, refer to Create a space. You can choose your preferred supported version of SageMaker distribution for the Jupyter Lab space. Run and open the Jupyter lab space after you create it.
Create and activate custom Conda environment
With a custom Conda environment, you can maintain an isolated, reproducible development environment with specific package versions. Open the terminal in the Jupyter Lab space and run the following commands to create and activate the Conda environment:
Install OpenJDK
Java must be installed inside the Conda environment because Scala needs it. Check if Java is already installed by running the following command:
If Java is not found, install OpenJDK 11, which is compatible with Spark 3.3.2:
Verify that the Java installation is successful:
Set JAVA_HOME
Validate that JAVA_HOME is updated with the configuration from Conda by running the following command:
Download and set up Coursier
Install the Coursier artifact manager using the following command:
Install the Scala (Almond) kernel
Run the following command to install the Almond kernel:
Fix kernel Java path
JupyterLab’s Scala kernel has difficulty locating the correct Java installation by default. This occurs because the kernel specification file (kernel.json) initially uses a generic Java path reference, which might not point to the actual Java installation on your SageMaker Studio instance. You must modify the Scala kernel’s configuration file (kernel.json) to explicitly specify the correct Java installation path.
Edit the kernel configuration located at the following location:
Update the java path to the absolute path returned by which java:
Launch the kernel
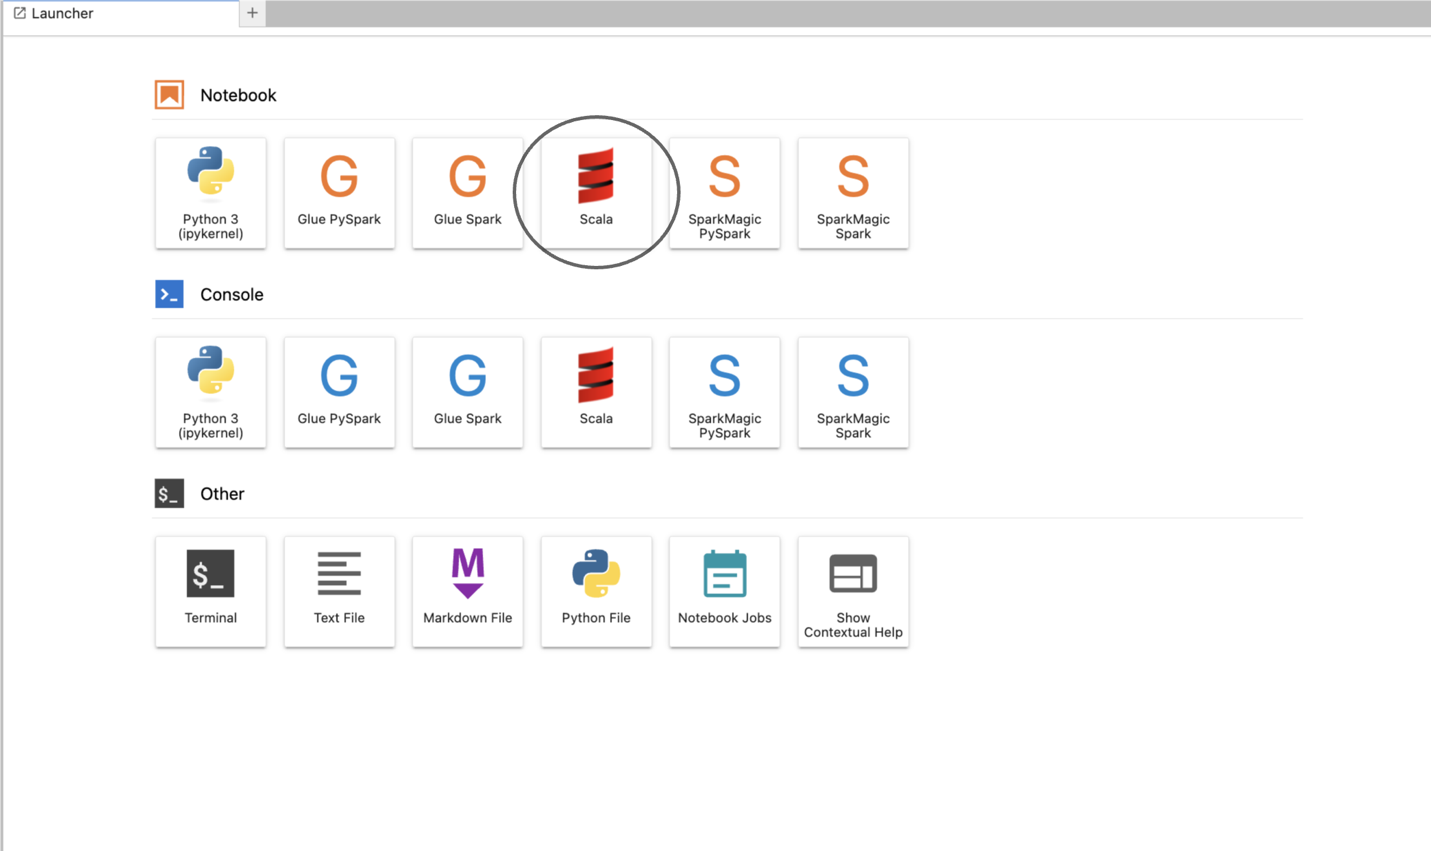
From the JupyterLab space launcher in SageMaker Studio, open a new notebook using the Scala kernel (see the following screenshot).
Test Spark integration
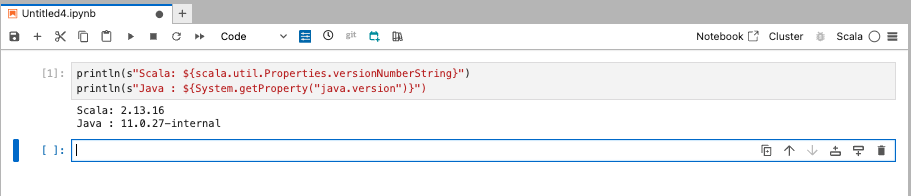
Use the following sample code to verify if the Scala kernel is functioning:
The following is an example of the expected output:
Technical considerations during and after deployment
In this section, we discuss some of the key considerations when working with the Scala kernel on SageMaker Studio:
- Verifying the correct version of the JVM is critical, particularly when using Scala for Spark-based data processing. Spark has specific JVM version requirements, and incompatibilities can lead to performance degradation or runtime failures. It is essential to identify Spark compatibility requirements, typically documented in the official Spark compatibility guide. Users should carefully select and manage JVM versions using tools such as Conda to maintain isolated environments with compatible JDK versions. Regular verification of the JVM version within the Scala kernel environment helps facilitate smooth operations and prevents unexpected issues. Maintaining isolation from the base Conda environments provided by SageMaker Studio is crucial for the stability and reliability of the overall environment. Custom kernels should always reside within isolated Conda environments to prevent dependency conflicts and package corruption. Such isolation facilitates smoother upgrades and maintenance without impacting other user workflows. Additionally, it simplifies troubleshooting and debugging processes by clearly distinguishing between custom and default packages. Because custom kernels are user-managed, the responsibility for maintaining the health and security of these environments lies with the user. Regular maintenance involves keeping all Scala libraries and dependencies up-to-date to mitigate vulnerabilities. Users should actively track updates to Spark and associated Scala libraries to maintain compatibility and optimize performance. Implementing routine monitoring and scheduling periodic reviews of installed packages are essential steps to promptly apply security patches and necessary updates.
By proactively addressing these technical considerations, teams can effectively integrate Scala workflows within SageMaker Studio, creating robust and reliable data science environments that complement the existing Python-centric tools. These settings remain intact even when SageMaker Studio is restarted.
Cost considerations
This solution uses open source tools and doesn’t incur additional AWS charges beyond the use of the underlying SageMaker Studio environment. Review the SageMaker Pricing to get additional pricing information.
Clean up
After successfully setting up and using your new Scala environment in SageMaker Studio, it’s important to clean up to maintain efficiency and cost-effectiveness. This step not only frees up space but also keeps your SageMaker Studio environment tidy and organized. You can always recreate the environment later if needed, following the steps outlined in this post. By maintaining good housekeeping practices, your SageMaker Studio remains optimized for your current projects and ready for future explorations.
- When you’re finished with your Scala work, shut down the SageMaker Studio kernel. This helps prevent unnecessary resource usage and potential charges. Additionally, if you no longer need the custom Conda environment you created for Scala, you can delete it entirely:
- Clean up associated SageMaker resources:
- Stop and delete running applications such as SageMaker Studio applications and notebooks within user profiles. Delete user profiles and shared spaces within the domain.
- On the SageMaker console, choose Domains in the navigation pane. Select the domain you want to delete. On the Actions menu, choose Delete.
Conclusion
By following this post, you can use Scala within SageMaker Studio, taking advantage of the powerful capabilities of Spark and Scala-based data engineering and analytics workflows. This setup is ideal for data scientists and engineers who rely on Scala’s concise syntax and functional programming constructs, especially when working with Spark-based pipelines.The following are additional resources that can help you further explore the Almond kernel, Coursier, and Scala:
- Almond Kernel GitHub repo Coursier CLI documentation Apache Spark compatibility guide Scala language tour
Start exploring these resources today to enhance your Scala development journey and streamline your ML workflows on SageMaker.
About the authors
 Varun Rajan is a Senior Solutions Architect supporting Strategic Industries at Amazon Web Services. Varun has over two decades of experience in designing, building, and optimizing cloud-based solutions for a diverse range of clients and specializes in translating complex business challenges into scalable, secure solutions that deliver measurable business value.
 Aakash Aggarwal is a Technical Account Manager at Amazon Web Services (AWS), based in the San Francisco Bay Area. He has over a decade of experience in the development and management of cloud-based workloads, and specializes in helping strategic AWS customers accelerate their cloud adoption. His focus areas include AI/ML, containerization, and observability on AWS.
