Welcome to this getting started guide, we will use the new Hugging Face Inference DLCs and Amazon SageMaker Python SDK to deploy a transformer model for real-time inference.In this example, we are going to deploy a trained Hugging Face Transformer model onto SageMaker for inference.
Deploy s Hugging Face Transformer model to Amazon SageMaker for Inference
To deploy a model directly from the Hub to SageMaker we need to define 2 environment variables when creating the HuggingFaceModel. We need to define:
HF_MODEL_ID: defines the model id, which will be automatically loaded from huggingface.co/models when creating or SageMaker Endpoint. The 🤗 Hub provides +10 000 models all available through this environment variable.HF_TASK: defines the task for the used 🤗 Transformers pipeline. A full list of tasks can be found here.
from sagemaker.huggingface import HuggingFaceModelfrom uuid import uuid4import sagemakerrole = sagemaker.get_execution_role()# Hub Model configuration. https://huggingface.co/modelshub = { 'HF_MODEL_ID':'yiyanghkust/finbert-tone', # model_id from hf.co/models 'HF_TASK':'text-classification' # NLP task you want to use for predictions}# endpoint nameendpoint_name=f'{hub["HF_MODEL_ID"].split("/")[1]}-{str(uuid4())}' # model and endpoint name# create Hugging Face Model Classhuggingface_model = HuggingFaceModel( env=hub, role=role, # iam role with permissions to create an Endpoint name=endpoint_name, # model and endpoint name transformers_version="4.11", # transformers version used pytorch_version="1.9", # pytorch version used py_version="py38", # python version of the DLC)
Next step is to deploy our endpoint.
# deploy model to SageMaker Inferencepredictor = huggingface_model.deploy( initial_instance_count=1, instance_type="ml.c5.large")# get aws region for dashboardsaws_region = predictor.sagemaker_session.boto_region_name
Architecture
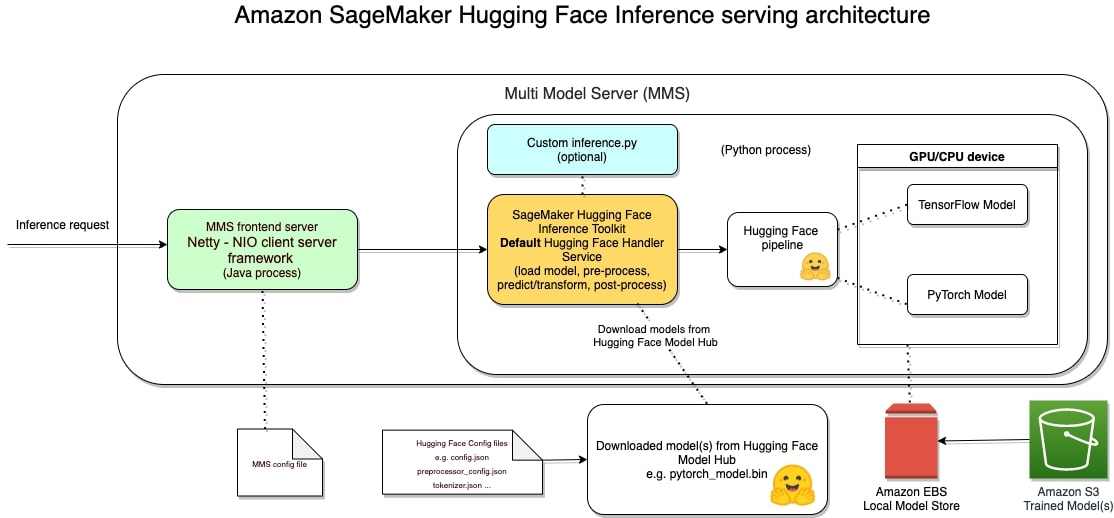
The Hugging Face Inference Toolkit for SageMaker is an open-source library for serving Hugging Face transformer models on SageMaker. It utilizes the SageMaker Inference Toolkit for starting up the model server, which is responsible for handling inference requests. The SageMaker Inference Toolkit uses Multi Model Server (MMS) for serving ML models. It bootstraps MMS with a configuration and settings that make it compatible with SageMaker and allow you to adjust important performance parameters, such as the number of workers per model, depending on the needs of your scenario.
Deploying a model using SageMaker hosting services is a three-step process:
Create a model in SageMaker —By creating a model, you tell SageMaker where it can find the model components.Create an endpoint configuration for an HTTPS endpoint —You specify the name of one or more models in production variants and the ML compute instances that you want SageMaker to launch to host each production variant.Create an HTTPS endpoint —Provide the endpoint configuration to SageMaker. The service launches the ML compute instances and deploys the model or models as specified in the configurationhttps://www.philschmid.de/static/blog/auto-scaling-sagemaker-huggingface/sm-endpoint.pngggingface/sm-endpoint.png" alt="">
After the endpoint is deployed we can use the predictor to send requests.
# example request, you always need to define "inputs"data = { "inputs": "There is a shortage of capital for project SageMaker. We need extra financing"}# requestpredictor.predict(data)# [{'label': 'negative', 'score': 0.9870443940162659}]
Model Monitoring
To properly monitor our endpoint lets send a few hundred requests.
for i in range(500): predictor.predict(data)
After that we can go to the cloudwatch dashboard to take a look.
Amazon SageMaker is a fully managed service that provides every developer and data scientist with the ability to quickly build, train, and deploy machine learning (ML) models at scale.
Autoscaling is an out-of-the-box feature that monitors your workloads and dynamically adjusts the capacity to maintain steady and predictable performance at the possible lowest cost.
The following diagram is a sample architecture that showcases how ahttps://www.philschmid.de/static/blog/auto-scaling-sagemaker-huggingface/autoscaling-endpoint.pngc="/static/blog/auto-scaling-sagemaker-huggingface/autoscaling-endpoint.png" alt="autoscaling-endpoint">
Configure Autoscaling for our Endpoint
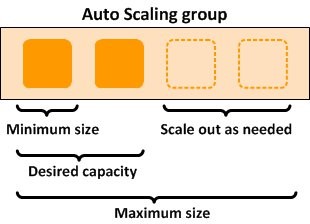
You can define the minimum, desired, and the maximum number of instances per endpoint and, based on the autoscaling configurations, instahttps://www.philschmid.dehttps://www.philschmid.de/static/blog/auto-scaling-sagemaker-huggingface/scaling-options.jpeg architecture.
AWS offers many different ways to auto-scale your endpoints. One of them Simple-Scaling, where you scale the instance capacity based on CPUUtilization of the instances or SageMakerVariantInvocationsPerInstance.
In this example we are going to use CPUUtilization to auto-scale our Endpoint
import boto3# Let us define a client to play with autoscaling optionsasg_client = boto3.client('application-autoscaling') # Common class representing Application Auto Scaling for SageMaker amongst other services# the resource type is variant and the unique identifier is the resource ID.# Example: endpoint/my-bert-fine-tuned/variant/AllTraffic .resource_id=f"endpoint/{predictor.endpoint_name}/variant/AllTraffic"# scaling configurationresponse = asg_client.register_scalable_target( ServiceNamespace='sagemaker', # ResourceId=resource_id, ScalableDimension='sagemaker:variant:DesiredInstanceCount', MinCapacity=1, MaxCapacity=4)
Create Scaling Policy with configuration details, e.g. TargetValue when the instance should be scaled.
from concurrent.futures import ThreadPoolExecutorimport osworkers = os.cpu_count() * 5requests = 200print(f"workers used for load test: {workers}")with ThreadPoolExecutor(max_workers=workers) as executor: for i in range(requests): executor.submit(predictor.predict, data)
Now we check the endpoint instance_count number an see that SageMaker has scaled out.
bt_sm = boto3.client('sagemaker')response = bt_sm.describe_endpoint(EndpointName=predictor.endpoint_name)print(f"Endpoint {response['EndpointName']} has \nCurrent Instance Count: {response['ProductionVariants'][0]['CurrentInstanceCount']}\nWith a desired instance count of {response['ProductionVariants'][0]['DesiredInstanceCount']}")# Endpoint finbert-tone-73d26f97-9376-4b3f-9334-a2-2021-10-29-12-18-52-365 has# Current Instance Count: 4# With a desired instance count of 4
Clean up
# delete endpointpredictor.delete_endpoint()
Conclusion
With the help of the Autoscaling groups were we able to apply elasticity without heavy lifting. The endpoint now adapts to the incoming load and scales in and out as required.
Through the simplicity of SageMaker you don't need huge Ops-teams anymore to manage and scale your machine learning models. You can do it yourself.
You can find the code here and feel free open a thread the forum.
Thanks for reading. If you have any questions, feel free to contact me, through Github, or on the forum. You can also connect with me on Twitter or LinkedIn.