
Welcome to this end-to-end multilingual Text-Classification example using PyTorch. In this demo, we will use the Hugging Faces transformers and datasets library together with Pytorch to fine-tune a multilingual transformer for text-classification. This example is a derived version of the text-classificiaton.ipynb notebook and uses Amazon SageMaker for distributed training. In the text-classificiaton.ipynb we showed how to fine-tune distilbert-base-multilingual-cased on the amazon_reviews_multi dataset for sentiment-analysis. This dataset has over 1.2 million data points, which is huge. Running training would take on 1x NVIDIA V100 takes around 6,5h for batch_size 16, which is quite long.
To scale and accelerate our training we will use Amazon SageMaker, which provides two strategies for distributed training, data parallelism and model parallelism. Data parallelism splits a training set across several GPUs, while model parallelism splits a model across several GPUs. We are going to use SageMaker Data Parallelism, which has been built into the Trainer API. To be able use data-parallelism we only have to define the distribution parameter in our HuggingFace estimator.
I moved the "training" part of the text-classificiaton.ipynb notebook into a separate training script train.py, which accepts the same hyperparameter and can be run on Amazon SageMaker using the HuggingFace estimator.
Our goal is to decrease the training duration by scaling our global/effective batch size from 16 up to 128, which is 8x bigger than before. For monitoring our training we will use the new Training Metrics support by the Hugging Face Hub
Installation
#!pip install sagemaker!pip install transformers datasets tensorboard datasets[s3] --upgradeThis example will use the Hugging Face Hub as remote model versioning service. To be able to push our model to the Hub, you need to register on the Hugging Face.If you already have an account you can skip this step.After you have an account, we will use the notebook_login util from the huggingface_hub package to log into our account and store our token (access key) on the disk.
from huggingface_hub import notebook_login notebook_login()Setup & Configuration
In this step we will define global configurations and parameters, which are used across the whole end-to-end fine-tuning proccess, e.g. tokenizer and model we will use.
import sagemaker sess = sagemaker.Session()# sagemaker session bucket -> used for uploading data, models and logs# sagemaker will automatically create this bucket if it not existssagemaker_session_bucket=Noneif sagemaker_session_bucket is None and sess is not None: # set to default bucket if a bucket name is not given sagemaker_session_bucket = sess.default_bucket() role = sagemaker.get_execution_role()sess = sagemaker.Session(default_bucket=sagemaker_session_bucket) print(f"sagemaker role arn: {role}")print(f"sagemaker bucket: {sess.default_bucket()}")print(f"sagemaker session region: {sess.boto_region_name}")Note: The execution role is only available when running a notebook within SageMaker (SageMaker Notebook Instances or Studio). If you run get_execution_role in a notebook not on SageMaker, expect a region error.
You can comment in the cell below and provide a an IAM Role name with SageMaker permissions to setup your environment out side of SageMaker.
# import sagemaker# import boto3# import os # os.environ["AWS_DEFAULT_REGION"]="your-region" # # This ROLE needs to exists with your associated AWS Credentials and needs permission for SageMaker# ROLE_NAME='role-name-of-your-iam-role-with-right-permissions' # iam_client = boto3.client('iam')# role = iam_client.get_role(RoleName=ROLE_NAME)['Role']['Arn']# sess = sagemaker.Session() # print(f"sagemaker role arn: {role}")# print(f"sagemaker bucket: {sess.default_bucket()}")# print(f"sagemaker session region: {sess.boto_region_name}")In this example are we going to fine-tune the distilbert-base-multilingual-cased a multilingual DistilBERT model.
model_id = "distilbert-base-multilingual-cased" # name for our repository on the hubmodel_name = model_id.split("/")[-1] if "/" in model_id else model_idrepo_name = f"{model_name}-sentiment"Dataset & Pre-processing
As Dataset we will use the amazon_reviews_multi a multilingual text-classification. The dataset contains reviews in English, Japanese, German, French, Chinese and Spanish, collected between November 1, 2015 and November 1, 2019. Each record in the dataset contains the review text, the review title, the star rating, an anonymized reviewer ID, an anonymized product ID and the coarse-grained product category (e.g. ‘books’, ‘appliances’, etc.) The corpus is balanced across stars, so each star rating constitutes 20% of the reviews in each language.
dataset_id="amazon_reviews_multi"dataset_config="all_languages" seed=33To load the amazon_reviews_multi dataset, we use the load_dataset() method from the 🤗 Datasets library.
from datasets import load_dataset dataset = load_dataset(dataset_id,dataset_config)Pre-processing & Tokenization
The amazon_reviews_multi has 5 classes (stars) to match those into a sentiment-analysis task we will map those star ratings to the following classes labels:
[1-2]: Negative[3]: Neutral[4-5]: PositiveThose labels can be later used to create a user friendly output after we fine-tuned our model.
from datasets import ClassLabel def map_start_to_label(review): if review["stars"] < 3: review["stars"] = 0 elif review["stars"] == 3: review["stars"] = 1 else: review["stars"] = 2 return review # convert 1-5 star reviews to 0,1,2dataset = dataset.map(map_start_to_label) # convert feature from Value to ClassLabelclass_feature = ClassLabel(names=['negative','neutral', 'positive'])dataset = dataset.cast_column("stars", class_feature) # rename our target column to labelsdataset = dataset.rename_column("stars","labels") # drop columns that are not neededdataset = dataset.remove_columns(['review_id', 'product_id', 'reviewer_id', 'review_title', 'language', 'product_category'])Before we prepare the dataset for training. Lets take a quick look at the class distribution of the dataset.
import pandas as pd df = dataset["train"].to_pandas() df.hist()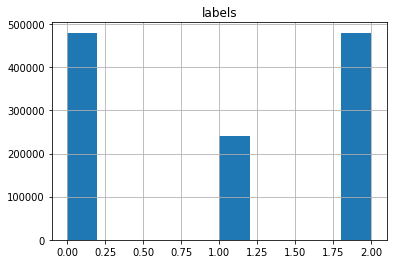
The Distribution is not perfect, but lets give it a try and improve on this later.
To train our model we need to convert our "Natural Language" to token IDs. This is done by a 🤗 Transformers Tokenizer which will tokenize the inputs (including converting the tokens to their corresponding IDs in the pretrained vocabulary). If you are not sure what this means check out chapter 6 of the Hugging Face Course.
from transformers import AutoTokenizer tokenizer = AutoTokenizer.from_pretrained(model_id)Additionally we add the truncation=True and max_length=512 to align the length and truncate texts that are bigger than the maximum size allowed by the model.
def process(examples): tokenized_inputs = tokenizer( examples["review_body"], truncation=True, max_length=512 ) return tokenized_inputs tokenized_datasets = dataset.map(process, batched=True)tokenized_datasets["train"].featuresBefore we can start our distributed Training, we need to upload our already pre-processed dataset to Amazon S3. Therefore we will use the built-in utils of datasets
import botocorefrom datasets.filesystems import S3FileSystem s3 = S3FileSystem() # save train_dataset to s3training_input_path = f's3://{sess.default_bucket()}/{dataset_id}/train'tokenized_datasets["train"].save_to_disk(training_input_path, fs=s3) # save validation_dataset to s3eval_input_path = f's3://{sess.default_bucket()}/{dataset_id}/test'tokenized_datasets["validation"].save_to_disk(eval_input_path, fs=s3)Creating an Estimator and start a training job
Last step before we can start our managed training is to define our Hyperparameters, create our sagemaker HuggingFace estimator and configure distributed training.
from sagemaker.huggingface import HuggingFacefrom huggingface_hub import HfFolder # hyperparameters, which are passed into the training jobhyperparameters={ 'model_id':'distilbert-base-multilingual-cased', 'epochs': 3, 'per_device_train_batch_size': 16, 'per_device_eval_batch_size': 16, 'learning_rate': 3e-5*8, 'fp16': True, # logging & evaluation strategie 'strategy':'steps', 'steps':5_000, 'save_total_limit':2, 'load_best_model_at_end':True, 'metric_for_best_model':"f1", # push to hub config 'push_to_hub': True, 'hub_model_id': 'distilbert-base-multilingual-cased-sentiment-2', 'hub_token': HfFolder.get_token()} # configuration for running training on smdistributed Data Paralleldistribution = {'smdistributed':{'dataparallel':{ 'enabled': True }}} # create the Estimatorhuggingface_estimator = HuggingFace( entry_point = 'train.py', source_dir = './scripts', instance_type = 'ml.p3.16xlarge', instance_count = 1, role = role, transformers_version = '4.12', pytorch_version = '1.9', py_version = 'py38', hyperparameters = hyperparameters, distribution = distribution)Since, we are using SageMaker Data Parallelism our total_batch_size will be per_device_train_batch_size * n_gpus.
# define a data input dictonary with our uploaded s3 urisdata = { 'train': training_input_path, 'eval': eval_input_path} # starting the train job with our uploaded datasets as input# setting wait to False to not expose the HF Tokenhuggingface_estimator.fit(data,wait=False)Since we are using the Hugging Face Hub intergration with Tensorboard we can inspect our progress directly on the hub, as well as testing checkpoints during the training.
from huggingface_hub import HfApi whoami = HfApi().whoami()username = whoami['name'] print(f"https://huggingface.co/{username}/{hyperparameters['hub_model_id']}")Conclusion
We managed to scale our training from 1x GPU to 8x GPU without any issues or code changes required. We used the Python SageMaker SDK to create our managed training job and only needed to provide some information about the environment our training should run, our training script and our hyperparameters.
With this we were able to reduce the training time from 6,5 hours to ~1,5 hours, which is huge! With this we can evaluate and test ~5x more models than before.
You can find the code here and feel free to open a thread on the forum.
Thanks for reading. If you have any questions, feel free to contact me, through Github, or on the forum. You can also connect with me on Twitter or LinkedIn.
