本文介绍了如何使用Hugging Face Transformers微调Donut模型进行文档理解与解析。Donut模型是一种无需OCR的文档理解模型,在视觉文档分类和信息提取任务中表现出色。教程涵盖了开发环境设置、SROIE数据集加载、数据准备、模型微调和评估等步骤。通过使用Hugging Face生态系统中的功能,如模型版本控制和实验跟踪,用户可以轻松地微调Donut模型并应用于实际场景。
In this blog, you will learn how to fine-tune Donut-base for document-understand/document-parsing using Hugging Face Transformers. Donut is a new document-understanding model achieving state-of-art performance with an MIT-license, which allows it to be used for commercial purposes compared to other models like LayoutLMv2/LayoutLMv3.We are going to use all of the great features from the Hugging Face ecosystem, like model versioning and experiment tracking.
We will use the SROIE dataset a collection of 1000 scanned receipts, including their OCR. More information for the dataset can be found at the repository.
Before we can start, make sure you have a Hugging Face Account to save artifacts and experiments.
Quick intro: Document Understanding Transformer (Donut) by ClovaAI
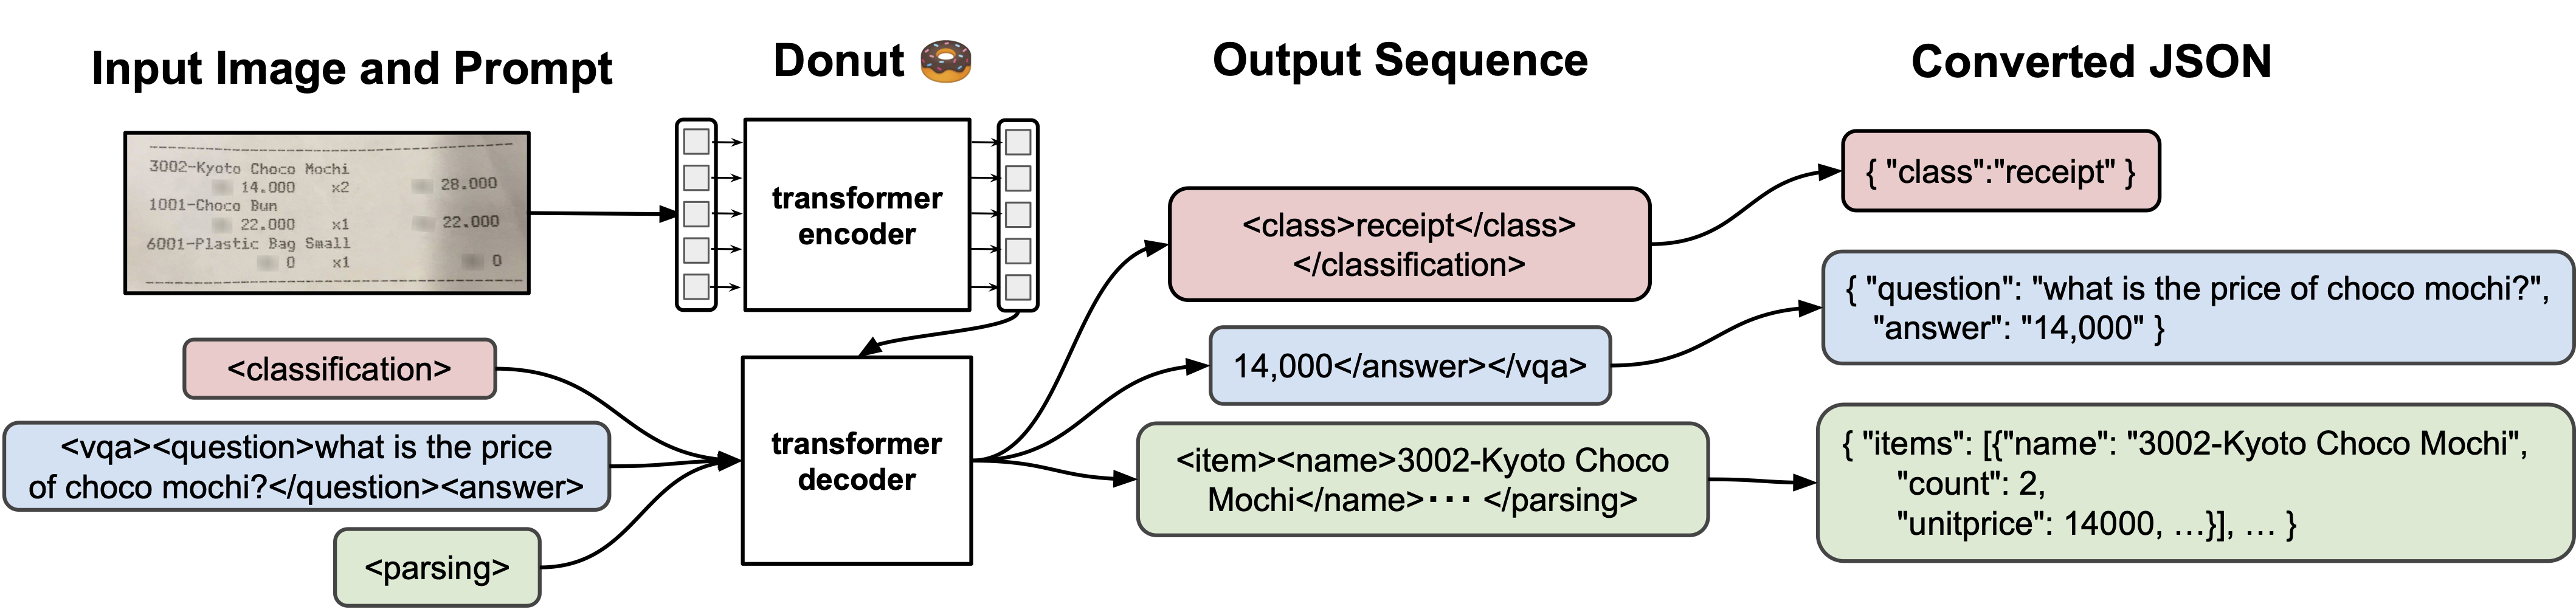
Document Understanding Transformer (Donut) is a new Transformer model for OCR-free document understanding. It doesn't require an OCR engine to process scanned documents but is achieving state-of-the-art performances on various visual document understanding tasks, such as visual document classification or information extraction (a.k.a. document parsing).Donut is a multimodal sequence-to-sequence model with a vision encoder (Swin Transformer) and text decoder (BART). The encoder receives the images and computes it into an embedding, which is then passed to the decoder, which generates a sequence of tokens.
Now we know how Donut works, so let's get started. 🚀
Note: This tutorial was created and run on a p3.2xlarge AWS EC2 Instance including a NVIDIA V100.
1. Setup Development Environment
Our first step is to install the Hugging Face Libraries, including transformers and datasets. Running the following cell will install all the required packages.
Note: At the time of writing this Donut is not yet included in the PyPi version of Transformers, so we need it to install from the main branch. Donut will be added in version 4.22.0.
!pip install -q git+https://github.com/huggingface/transformers.git# !pip install -q "transformers>=4.22.0" # comment in when version is released!pip install -q datasets sentencepiece tensorboard# install git-fls for pushing model and logs to the hugging face hub!sudo apt-get install git-lfs --yes
This example will use the Hugging Face Hub as a remote model versioning service. To be able to push our model to the Hub, you need to register on the Hugging Face.If you already have an account, you can skip this step.After you have an account, we will use the notebook_login util from the huggingface_hub package to log into our account and store our token (access key) on the disk.
from huggingface_hub import notebook_loginnotebook_login()
2. Load SROIE dataset
We will use the SROIE dataset a collection of 1000 scanned receipts including their OCR, more specifically we will use the dataset from task 2 "Scanned Receipt OCR". The available dataset on Hugging Face (darentang/sroie) is not compatible with Donut. Thats why we will use the original dataset together with the imagefolder feature of datasets to load our dataset. Learn more about loading image data here.
Note: The test data for task2 is sadly not available. Meaning that we end up only with 624 images.
First, we will clone the repository, extract the dataset into a separate folder and remove the unnecessary files.
Now we have two folders inside the data/ directory. One contains the images of the receipts and the other contains the OCR text. The nex step is to create a metadata.json file that contains the information about the images including the OCR-text. This is necessary for the imagefolder feature of datasets.
The metadata.json should look at the end similar to the example below.
{"file_name": "0001.png", "text": "This is a golden retriever playing with a ball"}{"file_name": "0002.png", "text": "A german shepherd"}
In our example will "text" column contain the OCR text of the image, which will later be used for creating the Donut specific format.
import osimport jsonfrom pathlib import Pathimport shutil# define pathsbase_path = Path("data")metadata_path = base_path.joinpath("key")image_path = base_path.joinpath("img")# define metadata listmetadata_list = []# parse metadatafor file_name in metadata_path.glob("*.json"): with open(file_name, "r") as json_file: # load json file data = json.load(json_file) # create "text" column with json string text = json.dumps(data) # add to metadata list if image exists if image_path.joinpath(f"{file_name.stem}.jpg").is_file(): metadata_list.append({"text":text,"file_name":f"{file_name.stem}.jpg"}) # delete json file# write jsonline filewith open(image_path.joinpath('metadata.jsonl'), 'w') as outfile: for entry in metadata_list: json.dump(entry, outfile) outfile.write('\n')# remove old meta datashutil.rmtree(metadata_path)
Good Job! Now we can load the dataset using the imagefolder feature of datasets.
import randomrandom_sample = random.randint(0, len(dataset))print(f"Random sample is {random_sample}")print(f"OCR text is {dataset[random_sample]['text']}")dataset[random_sample]['image'].resize((250,400))# OCR text is {"company": "LIM SENG THO HARDWARE TRADING", "date": "29/12/2017", "address": "NO 7, SIMPANG OFF BATU VILLAGE, JALAN IPOH BATU 5, 51200 KUALA LUMPUR MALAYSIA", "total": "6.00"}
3. Prepare dataset for Donut
As we learned in the introduction, Donut is a sequence-to-sequence model with a vision encoder and text decoder. When fine-tuning the model we want it to generate the "text" based on the image we pass it. Similar to NLP tasks, we have to tokenize and preprocess the text.Before we can tokenize the text, we need to transform the JSON string into a Donut compatible document.
current JSON string
{ "company": "ADVANCO COMPANY", "date": "17/01/2018", "address": "NO 1&3, JALAN WANGSA DELIMA 12, WANGSA LINK, WANGSA MAJU, 53300 KUALA LUMPUR", "total": "7.00"}
Donut document
<s></s><s_company>ADVANCO COMPANY</s_company><s_date>17/01/2018</s_date><s_address>NO 1&3, JALAN WANGSA DELIMA 12, WANGSA LINK, WANGSA MAJU, 53300 KUALA LUMPUR</s_address><s_total>7.00</s_total></s>
To easily create those documents the ClovaAI team has created a json2token method, which we extract and then apply.
new_special_tokens = [] # new tokens which will be added to the tokenizertask_start_token = "<s>" # start of task tokeneos_token = "</s>" # eos token of tokenizerdef json2token(obj, update_special_tokens_for_json_key: bool = True, sort_json_key: bool = True): """ Convert an ordered JSON object into a token sequence """ if type(obj) == dict: if len(obj) == 1 and "text_sequence" in obj: return obj["text_sequence"] else: output = "" if sort_json_key: keys = sorted(obj.keys(), reverse=True) else: keys = obj.keys() for k in keys: if update_special_tokens_for_json_key: new_special_tokens.append(fr"<s_{k}>") if fr"<s_{k}>" not in new_special_tokens else None new_special_tokens.append(fr"</s_{k}>") if fr"</s_{k}>" not in new_special_tokens else None output += ( fr"<s_{k}>" + json2token(obj[k], update_special_tokens_for_json_key, sort_json_key) + fr"</s_{k}>" ) return output elif type(obj) == list: return r"<sep/>".join( [json2token(item, update_special_tokens_for_json_key, sort_json_key) for item in obj] ) else: # excluded special tokens for now obj = str(obj) if f"<{obj}/>" in new_special_tokens: obj = f"<{obj}/>" # for categorical special tokens return objdef preprocess_documents_for_donut(sample): # create Donut-style input text = json.loads(sample["text"]) d_doc = task_start_token + json2token(text) + eos_token # convert all images to RGB image = sample["image"].convert('RGB') return {"image": image, "text": d_doc}proc_dataset = dataset.map(preprocess_documents_for_donut)print(f"Sample: {proc_dataset[45]['text']}")print(f"New special tokens: {new_special_tokens + [task_start_token] + [eos_token]}")# Sample: <s><s_total>$6.90</s_total><s_date>27 MAR 2018</s_date><s_company>UNIHAKKA INTERNATIONAL SDN BHD</s_company><s_address>12, JALAN TAMPOI 7/4,KAWASAN PARINDUSTRIAN TAMPOI,81200 JOHOR BAHRU,JOHOR</s_address></s># New special tokens: ['<s_total>', '</s_total>', '<s_date>', '</s_date>', '<s_company>', '</s_company>', '<s_address>', '</s_address>', '<s>', '</s>']
The next step is to tokenize our text and encode the images into tensors. Therefore we need to load DonutProcessor, add our new special tokens and adjust the size of the images when processing from [1920, 2560] to [720, 960] to need less memory and have faster training.
from transformers import DonutProcessor# Load processorprocessor = DonutProcessor.from_pretrained("naver-clova-ix/donut-base")# add new special tokens to tokenizerprocessor.tokenizer.add_special_tokens({"additional_special_tokens": new_special_tokens + [task_start_token] + [eos_token]})# we update some settings which differ from pretraining; namely the size of the images + no rotation required# resizing the image to smaller sizes from [1920, 2560] to [960,1280]processor.feature_extractor.size = [720,960] # should be (width, height)processor.feature_extractor.do_align_long_axis = False
Now, we can prepare our dataset, which we will use for the training later.
def transform_and_tokenize(sample, processor=processor, split="train", max_length=512, ignore_id=-100): # create tensor from image try: pixel_values = processor( sample["image"], random_padding=split == "train", return_tensors="pt" ).pixel_values.squeeze() except Exception as e: print(sample) print(f"Error: {e}") return {} # tokenize document input_ids = processor.tokenizer( sample["text"], add_special_tokens=False, max_length=max_length, padding="max_length", truncation=True, return_tensors="pt", )["input_ids"].squeeze(0) labels = input_ids.clone() labels[labels == processor.tokenizer.pad_token_id] = ignore_id # model doesn't need to predict pad token return {"pixel_values": pixel_values, "labels": labels, "target_sequence": sample["text"]}# need at least 32-64GB of RAM to run thisprocessed_dataset = proc_dataset.map(transform_and_tokenize,remove_columns=["image","text"])
# from datasets import load_from_disk# from transformers import DonutProcessor## COMMENT IN in case you want to save the processed dataset to disk in case of error later# processed_dataset.save_to_disk("processed_dataset")# processor.save_pretrained("processor")## COMMENT IN in case you want to load the processed dataset from disk in case of error later# processed_dataset = load_from_disk("processed_dataset")# processor = DonutProcessor.from_pretrained("processor")
The last step is to split the dataset into train and validation sets.
After we have processed our dataset, we can start training our model. Therefore we first need to load the naver-clova-ix/donut-base model with the VisionEncoderDecoderModel class. The donut-base includes only the pre-trained weights and was introduced in the paper OCR-free Document Understanding Transformer by Geewok et al. and first released in this repository.
In addition to loading our model, we are resizing the embedding layer to match newly added tokens and adjusting the image_size of our encoder to match our dataset. We are also adding tokens for inference later.
import torchfrom transformers import VisionEncoderDecoderModel, VisionEncoderDecoderConfig# Load model from huggingface.comodel = VisionEncoderDecoderModel.from_pretrained("naver-clova-ix/donut-base")# Resize embedding layer to match vocabulary sizenew_emb = model.decoder.resize_token_embeddings(len(processor.tokenizer))print(f"New embedding size: {new_emb}")# Adjust our image size and output sequence lengthsmodel.config.encoder.image_size = processor.feature_extractor.size[::-1] # (height, width)model.config.decoder.max_length = len(max(processed_dataset["train"]["labels"], key=len))# Add task token for decoder to startmodel.config.pad_token_id = processor.tokenizer.pad_token_idmodel.config.decoder_start_token_id = processor.tokenizer.convert_tokens_to_ids(['<s>'])[0]# is done by Trainer# device = "cuda" if torch.cuda.is_available() else "cpu"# model.to(device)
Before we can start our training we need to define the hyperparameters (Seq2SeqTrainingArguments) we want to use for our training. We are leveraging the Hugging Face Hub integration of the Seq2SeqTrainer to automatically push our checkpoints, logs and metrics during training into a repository.
from huggingface_hub import HfFolderfrom transformers import Seq2SeqTrainingArguments, Seq2SeqTrainer# hyperparameters used for multiple argshf_repository_id = "donut-base-sroie"# Arguments for trainingtraining_args = Seq2SeqTrainingArguments( output_dir=hf_repository_id, num_train_epochs=3, learning_rate=2e-5, per_device_train_batch_size=2, weight_decay=0.01, fp16=True, logging_steps=100, save_total_limit=2, evaluation_strategy="no", save_strategy="epoch", predict_with_generate=True, # push to hub parameters report_to="tensorboard", push_to_hub=True, hub_strategy="every_save", hub_model_id=hf_repository_id, hub_token=HfFolder.get_token(),)# Create Trainertrainer = Seq2SeqTrainer( model=model, args=training_args, train_dataset=processed_dataset["train"],)
We can start our training by using the train method of the Seq2SeqTrainer.
# Start trainingtrainer.train()
After our training is done we also want to save our processor to the Hugging Face Hub and create a model card.
# Save processor and create model cardprocessor.save_pretrained(hf_repository_id)trainer.create_model_card()trainer.push_to_hub()
We sucessfully trainied our model now lets test it and then evaulate accuracy of it.
import reimport transformersfrom PIL import Imagefrom transformers import DonutProcessor, VisionEncoderDecoderModelimport torchimport randomimport numpy as np# hidde logstransformers.logging.disable_default_handler()# Load our model from Hugging Faceprocessor = DonutProcessor.from_pretrained("philschmid/donut-base-sroie")model = VisionEncoderDecoderModel.from_pretrained("philschmid/donut-base-sroie")# Move model to GPUdevice = "cuda" if torch.cuda.is_available() else "cpu"model.to(device)# Load random document image from the test settest_sample = processed_dataset["test"][random.randint(1, 50)]def run_prediction(sample, model=model, processor=processor): # prepare inputs pixel_values = torch.tensor(test_sample["pixel_values"]).unsqueeze(0) task_prompt = "<s>" decoder_input_ids = processor.tokenizer(task_prompt, add_special_tokens=False, return_tensors="pt").input_ids # run inference outputs = model.generate( pixel_values.to(device), decoder_input_ids=decoder_input_ids.to(device), max_length=model.decoder.config.max_position_embeddings, early_stopping=True, pad_token_id=processor.tokenizer.pad_token_id, eos_token_id=processor.tokenizer.eos_token_id, use_cache=True, num_beams=1, bad_words_ids=[[processor.tokenizer.unk_token_id]], return_dict_in_generate=True, ) # process output prediction = processor.batch_decode(outputs.sequences)[0] prediction = processor.token2json(prediction) # load reference target target = processor.token2json(test_sample["target_sequence"]) return prediction, targetprediction, target = run_prediction(test_sample)print(f"Reference:\n {target}")print(f"Prediction:\n {prediction}")processor.feature_extractor.to_pil_image(np.array(test_sample["pixel_values"])).resize((350,600))
Nice 😍🔥 Our fine-tuned parsed the document correctly and extracted the right values. Our next step is to evalute our model on the test set. Since the model itself is a seq2seq is not that straightforward to evaluate.
To keep things simple we will use accuracy as metric and compare the predicted value for each key in the dictionary to see if they are equal. This evaluation technique is biased/simple sincne only exact matches are truthy, e.g. if the model is not detecting a "whitespace" as in the example above it will not be counted truthy.
from tqdm import tqdm# define counter for samplestrue_counter = 0total_counter = 0# iterate over datasetfor sample in tqdm(processed_dataset["test"]): prediction, target = run_prediction(test_sample) for s in zip(prediction.values(), target.values()): if s[0] == s[1]: true_counter += 1 total_counter += 1print(f"Accuracy: {(true_counter/total_counter)*100}%")# Accuracy: 75.0%
Our model achieves an accuracy of 75% on the test set.
Note: The evaluation we did was very simple and only valued exact string matches as "truthy" for each key of the dictonary, is a big bias for the evaluation. Meaning that a accuracy of 75% is pretty good.
Our first inference test is an excellent example of why this metric is biased. There the model predicted for the address the value NO. 31G&33G, JALAN SETIA INDAH X ,U13/X 40170 SETIA ALAM and the ground truth was 'NO. 31G&33G, JALAN SETIA INDAH X,U13/X 40170 SETIA ALAM', where the only difference is the whitespace in between X and ,U13/X.In our evaluation loop, this was not counted as a truthy value.
Thanks for reading! If you have any questions, feel free to contact me, through Github, or on the forum. You can also connect with me on Twitter or LinkedIn.