
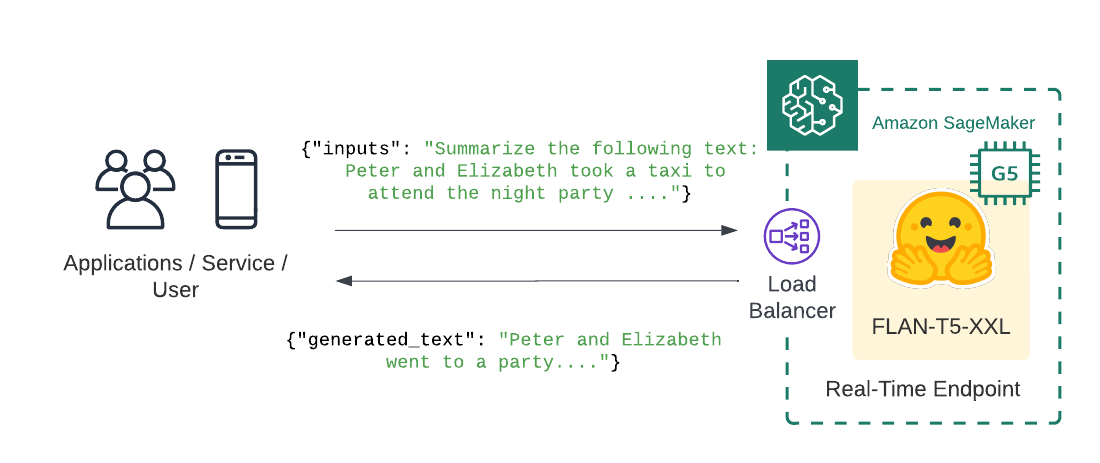
Welcome to this Amazon SageMaker guide on how to deploy the FLAN-T5-XXL on Amazon SageMaker for inference. We will deploy philschmid/flan-t5-xxl-sharded-fp16 to Amazon SageMake for real-time inference using Hugging Face Inference Deep Learning Container.
What we are going to do
- Create FLAN-T5 XXL inference script with bnb quantizationCreate SageMaker
model.tar.gz artifactDeploy the model to Amazon SageMakerRun inference using the deployed modelQuick intro: FLAN-T5, just a better T5
FLAN-T5 released with the Scaling Instruction-Finetuned Language Models paper is an enhanced version of T5 that has been finetuned in a mixture of tasks. The paper explores instruction finetuning with a particular focus on (1) scaling the number of tasks, (2) scaling the model size, and (3) finetuning on chain-of-thought data. The paper discovers that overall instruction finetuning is a general method for improving the performance and usability of pretrained language https://www.philschmid.de/static/blog/deploy-flan-t5-sagemaker/flan-t5.webpt5-sagemaker/flan-t5.webp" alt="flan-t5">
Before we can get started we have to install the missing dependencies to be able to create our model.tar.gz artifact and create our Amazon SageMaker endpoint.We also have to make sure we have the permission to create our SageMaker Endpoint.
!pip install "sagemaker==2.116.0" "huggingface_hub==0.12.0" --upgrade --quietIf you are going to use Sagemaker in a local environment (not SageMaker Studio or Notebook Instances). You need access to an IAM Role with the required permissions for Sagemaker. You can find here more about it.
import sagemakerimport boto3sess = sagemaker.Session()# sagemaker session bucket -> used for uploading data, models and logs# sagemaker will automatically create this bucket if it not existssagemaker_session_bucket=Noneif sagemaker_session_bucket is None and sess is not None: # set to default bucket if a bucket name is not given sagemaker_session_bucket = sess.default_bucket() try: role = sagemaker.get_execution_role()except ValueError: iam = boto3.client('iam') role = iam.get_role(RoleName='sagemaker_execution_role')['Role']['Arn'] sess = sagemaker.Session(default_bucket=sagemaker_session_bucket) print(f"sagemaker role arn: {role}")print(f"sagemaker bucket: {sess.default_bucket()}")print(f"sagemaker session region: {sess.boto_region_name}")1. Create FLAN-T5 XXL inference script with bnb quantization
Amazon SageMaker allows us to customize the inference script by providing a inference.py file. The inference.py file is the entry point to our model. It is responsible for loading the model and handling the inference request. If you are used to deploying Hugging Face Transformers that might be new to you. Usually, we just provide the HF_MODEL_ID and HF_TASK and the Hugging Face DLC takes care of the rest. For FLAN-T5-XXL thats not yet possible. We have to provide the inference.py file and implement the model_fn and predict_fn functions to efficiently load the 11B large model.
If you want to learn more about creating a custom inference script you can check out Creating document embeddings with Hugging Face's Transformers & Amazon SageMaker
In addition to the inference.py file we also have to provide a requirements.txt file. The requirements.txt file is used to install the dependencies for our inference.py file.
The first step is to create a code/ directory.
As next we create a requirements.txt file and add the accelerate and bitsandbytes library to it. The accelerate library is used efficiently to load the model on the GPU. The bitsandbytes library is used to quantize the model to 8bit using LLM.int8(). LLM.int8 introduces a new quantization technique for Int8 matrix multiplication, which cuts the memory needed for inference by half while. To learn more about check out this blog post or the paper.
%%writefile code/requirements.txtaccelerate==0.16.0transformers==4.26.0bitsandbytes==0.37.0The last step for our inference handler is to create the inference.py file. The inference.py file is responsible for loading the model and handling the inference request. The model_fn function is called when the model is loaded. The predict_fn function is called when we want to do inference.
We are using the AutoModelForSeq2SeqLM class from transformers load the model from the local directory (model_dir) in the model_fn. In the predict_fn function we are using the generate function from transformers to generate the text for a given input prompt.
%%writefile code/inference.pyfrom typing import Dict, List, Anyfrom transformers import AutoModelForSeq2SeqLM, AutoTokenizerimport torch def model_fn(model_dir): # load model and processor from model_dir model = AutoModelForSeq2SeqLM.from_pretrained(model_dir, device_map="auto", load_in_8bit=True) tokenizer = AutoTokenizer.from_pretrained(model_dir) return model, tokenizer def predict_fn(data, model_and_tokenizer): # unpack model and tokenizer model, tokenizer = model_and_tokenizer # process input inputs = data.pop("inputs", data) parameters = data.pop("parameters", None) # preprocess input_ids = tokenizer(inputs, return_tensors="pt").input_ids # pass inputs with all kwargs in data if parameters is not None: outputs = model.generate(input_ids, **parameters) else: outputs = model.generate(input_ids) # postprocess the prediction prediction = tokenizer.decode(outputs[0], skip_special_tokens=True) return [{"generated_text": prediction}] 2. Create SageMaker model.tar.gz artifact
To use our inference.py we need to bundle it together with our model weights into a model.tar.gz. The archive includes all our model-artifcats to run inference. The inference.py script will be placed into a code/ folder. We will use the huggingface_hub SDK to easily download philschmid/flan-t5-xxl-sharded-fp16 from Hugging Face and then upload it to Amazon S3 with the sagemaker SDK. The model philschmid/flan-t5-xxl-sharded-fp16 is a sharded fp16 version of the google/flan-t5-xxl
Make sure the enviornment has enough diskspace to store the model, ~30GB should be enough.
from distutils.dir_util import copy_treefrom pathlib import Pathfrom tempfile import TemporaryDirectoryfrom huggingface_hub import snapshot_download HF_MODEL_ID="philschmid/flan-t5-xxl-sharded-fp16"# create model dirmodel_tar_dir = Path(HF_MODEL_ID.split("/")[-1])model_tar_dir.mkdir() # setup temporary directorywith TemporaryDirectory() as tmpdir: # download snapshot snapshot_dir = snapshot_download(repo_id=HF_MODEL_ID, cache_dir=tmpdir) # copy snapshot to model dir copy_tree(snapshot_dir, str(model_tar_dir))The next step is to copy the code/ directory into the model/ directory.
# copy code/ to model dircopy_tree("code/", str(model_tar_dir.joinpath("code")))Before we can upload the model to Amazon S3 we have to create a model.tar.gz archive. Important is that the archive should directly contain all files and not a folder with the files. For example, your file should look like this:
model.tar.gz/|- config.json|- pytorch_model-00001-of-00012.bin|- tokenizer.json|- ...import tarfileimport os # helper to create the model.tar.gzdef compress(tar_dir=None,output_file="model.tar.gz"): parent_dir=os.getcwd() os.chdir(tar_dir) with tarfile.open(os.path.join(parent_dir, output_file), "w:gz") as tar: for item in os.listdir('.'): print(item) tar.add(item, arcname=item) os.chdir(parent_dir) compress(str(model_tar_dir))After we created the model.tar.gz archive we can upload it to Amazon S3. We will use the sagemaker SDK to upload the model to our sagemaker session bucket.
from sagemaker.s3 import S3Uploader # upload model.tar.gz to s3s3_model_uri = S3Uploader.upload(local_path="model.tar.gz", desired_s3_uri=f"s3://{sess.default_bucket()}/flan-t5-xxl") print(f"model uploaded to: {s3_model_uri}")3. Deploy the model to Amazon SageMaker
After we have uploaded our model archive we can deploy our model to Amazon SageMaker. We will use HuggingfaceModel to create our real-time inference endpoint.
We are going to deploy the model to an g5.xlarge instance. The g5.xlarge instance is a GPU instance with 1 NVIDIA A10G GPU. If you are interested in how you could add autoscaling to your endpoint you can check out Going Production: Auto-scaling Hugging Face Transformers with Amazon SageMaker.
from sagemaker.huggingface.model import HuggingFaceModel # create Hugging Face Model Classhuggingface_model = HuggingFaceModel( model_data=s3_model_uri, # path to your model and script role=role, # iam role with permissions to create an Endpoint transformers_version="4.17", # transformers version used pytorch_version="1.10", # pytorch version used py_version='py38', # python version used) # deploy the endpoint endpointpredictor = huggingface_model.deploy( initial_instance_count=1, instance_type="ml.g5.xlarge" )4. Run inference using the deployed model
The .deploy() returns an HuggingFacePredictor object which can be used to request inference using the .predict() method. Our endpoint expects a json with at least inputs key.
When using generative models, most of the time you want to configure or customize your prediction to fit your needs, for example by using beam search, configuring the max or min length of the generated sequence, or adjusting the temperature to reduce repetition.The Transformers library provides different strategies and kwargs to do this, the Hugging Face Inference toolkit offers the same functionality using the parameters attribute of your request payload. Below you can find examples on how to generate text without parameters, with beam search, and using custom configurations. If you want to learn about different decoding strategies check out this blog post.
payload = """Summarize the following text:Peter and Elizabeth took a taxi to attend the night party in the city. While in the party, Elizabeth collapsed and was rushed to the hospital.Since she was diagnosed with a brain injury, the doctor told Peter to stay besides her until she gets well.Therefore, Peter stayed with her at the hospital for 3 days without leaving.""" parameters = { "early_stopping": True, "length_penalty": 2.0, "max_new_tokens": 50, "temperature": 0, "min_length": 10, "no_repeat_ngram_size": 3,} # Run predictionpredictor.predict({ "inputs": payload, "parameters" :parameters})# [{'generated_text': 'Peter stayed with Elizabeth at the hospital for 3 days.'}]Lets try another examples! This time we focus ond questions answering with a step by step approach including some simple math.
payload = """Answer the following question step by step:Roger has 5 tennis balls. He buys 2 more cans of tennis balls.Each can has 3 tennis balls. How many tennis balls does he have now?""" parameters = { "early_stopping": True, "length_penalty": 2.0, "max_new_tokens": 50, "temperature": 0,} # Run predictionpredictor.predict({ "inputs": payload, "parameters" :parameters})# [{'generated_text': 'He buys 2 cans of tennis balls, so he has 2 * 3 = 6 tennis balls. He has 5 + 6 = 11 tennis balls now.'}]Delete model and endpoint
To clean up, we can delete the model and endpoint.
predictor.delete_model()predictor.delete_endpoint()Thanks for reading! If you have any questions, feel free to contact me on Twitter or LinkedIn.
