
As someone who has been using macOS since 2001 and Amazon EC2 Mac instances since their launch 4 years ago, I’ve helped numerous customers scale their continuous integration and delivery (CI/CD) pipelines on AWS. Today, I’m excited to share that Amazon EC2 M4 and M4 Pro Mac instances are now generally available.
Development teams building applications for Apple platforms need powerful computing resources to handle complex build processes and run multiple iOS simulators simultaneously. As development projects grow larger and more sophisticated, teams require increased performance and memory capacity to maintain rapid development cycles.
Apple M4 Mac mini at the core
EC2 M4 Mac instances (known as mac-m4.metal in the API) are built on Apple M4 Mac mini computers and are built on the AWS Nitro System. They feature Apple silicon M4 chips with 10-core CPU (four performance and six efficiency cores), 10-core GPU, 16-core Neural Engine, and 24 GB unified memory, delivering enhanced performance for iOS and macOS application build workloads. When building and testing applications, M4 Mac instances deliver up to 20 percent better application build performance compared to EC2 M2 Mac instances.
EC2 M4 Pro Mac (mac-m4pro.metal in the API) instances are powered by Apple silicon M4 Pro chips with 14-core CPU, 20-core GPU, 16-core Neural Engine, and 48 GB unified memory. These instances offer up to 15 percent better application build performance compared to EC2 M2 Pro Mac instances. The increased memory and computing power make it possible to run more tests in parallel using multiple device simulators.
Each M4 and M4 Pro Mac instance now comes with 2 TB of local storage, providing low-latency storage for improved caching and build and test performance.
Both instance types support macOS Sonoma version 15.6 and later as Amazon Machine Images (AMIs). The AWS Nitro System provides up to 10 Gbps of Amazon Virtual Private Cloud (Amazon VPC) network bandwidth and 8 Gbps of Amazon Elastic Block Store (Amazon EBS) storage bandwidth through high-speed Thunderbolt connections.
Amazon EC2 Mac instances integrate seamlessly with AWS services, which means you can:
Let me show you how to get started
You can launch an EC2 M4 or M4 Pro Mac instances through the AWS Management Console, AWS Command Line Interface (AWS CLI), or AWS SDKs.
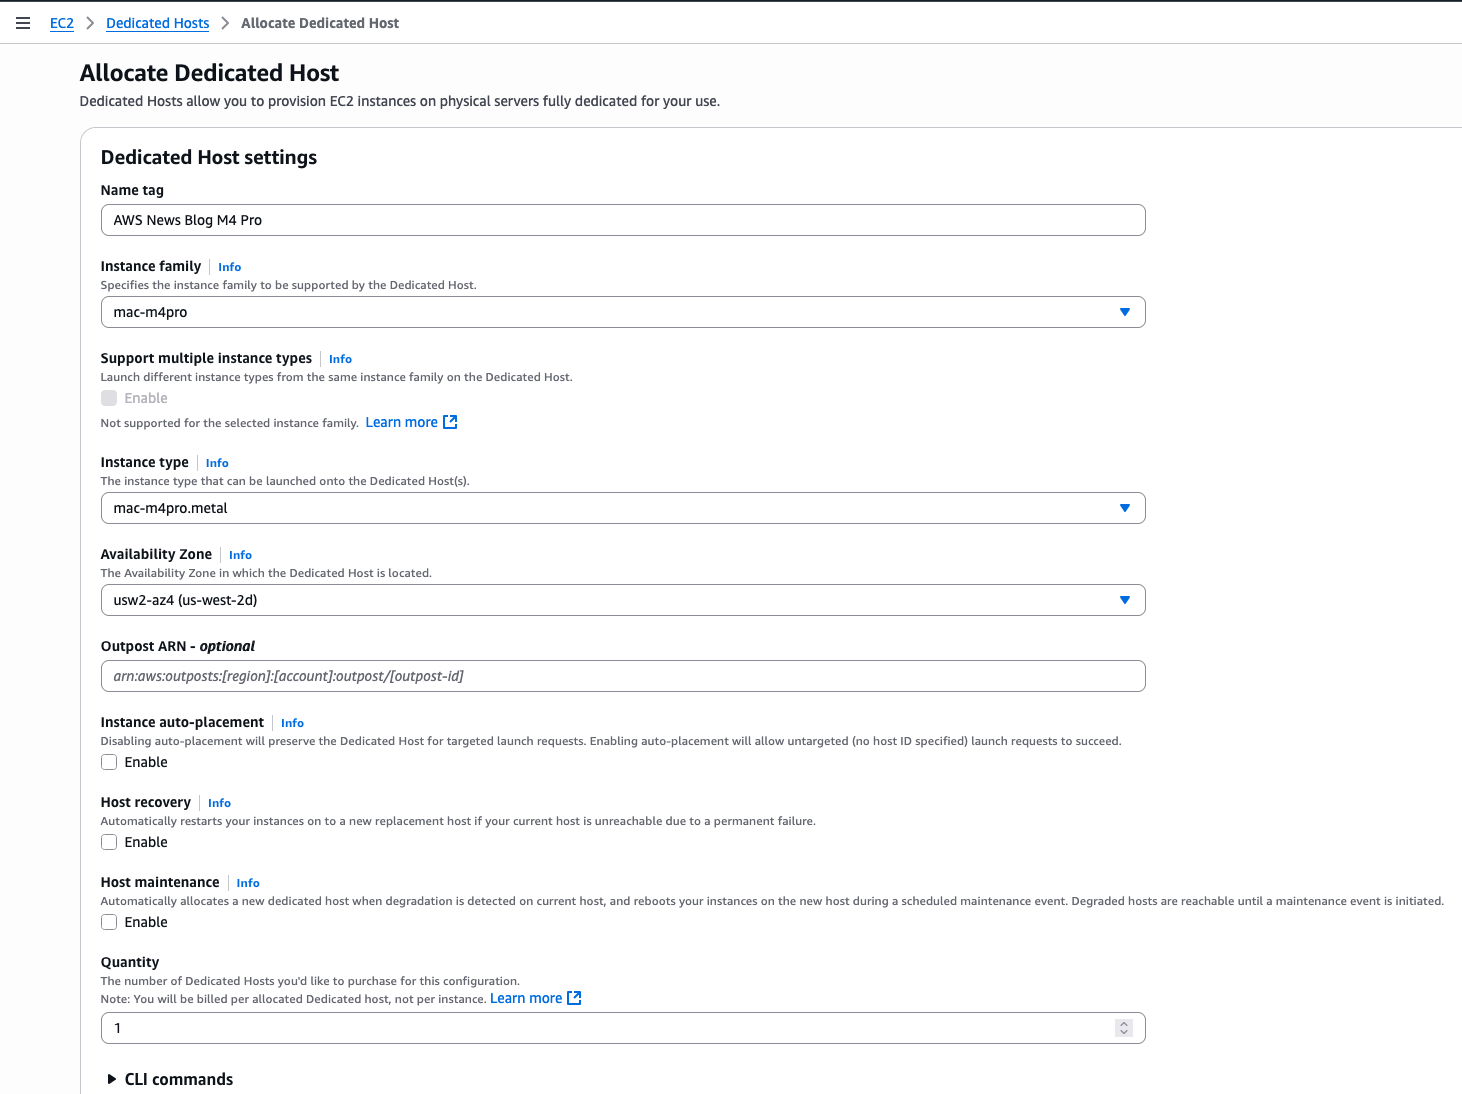
For this demo, let’s start an M4 Pro instance from the console. I first allocate a dedicated host to run my instances. On the AWS Management Console, I navigate to EC2, then Dedicated Hosts, and I select Allocate Dedicated Host.
Then, I enter a Name tag and I select the Instance family (mac-m4pro) and an Instance type (mac-m4pro.metal). I choose one Availability Zone and I clear Host maintenance.
Alternatively, I can use the command line interface:
aws ec2 allocate-hosts \ --availability-zone-id "usw2-az4" \ --auto-placement "off" \ --host-recovery "off" \ --host-maintenance "off" \ --quantity 1 \ --instance-type "mac-m4pro.metal"
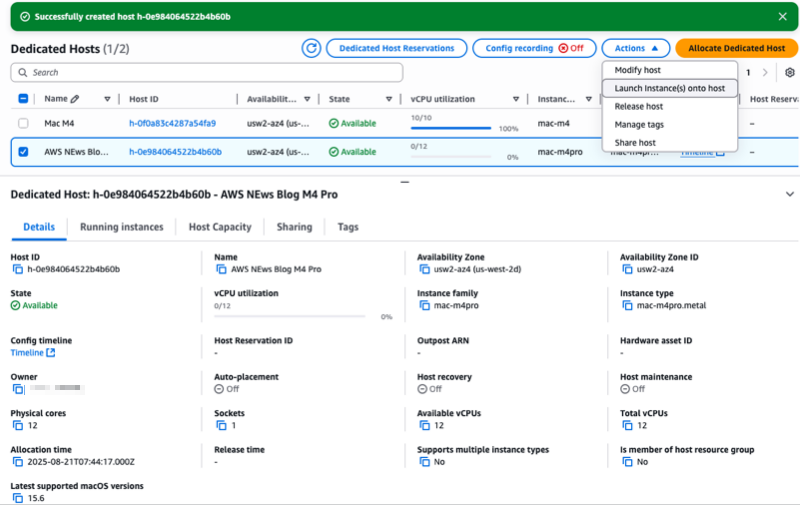
After the dedicated host is allocated to my account, I select the host I just allocated, then I select the Actions menu and choose Launch instance(s) onto host.
Notice the console gives you, among other information, the Latest supported macOS versions for this type of host. In this case, it’s macOS 15.6.
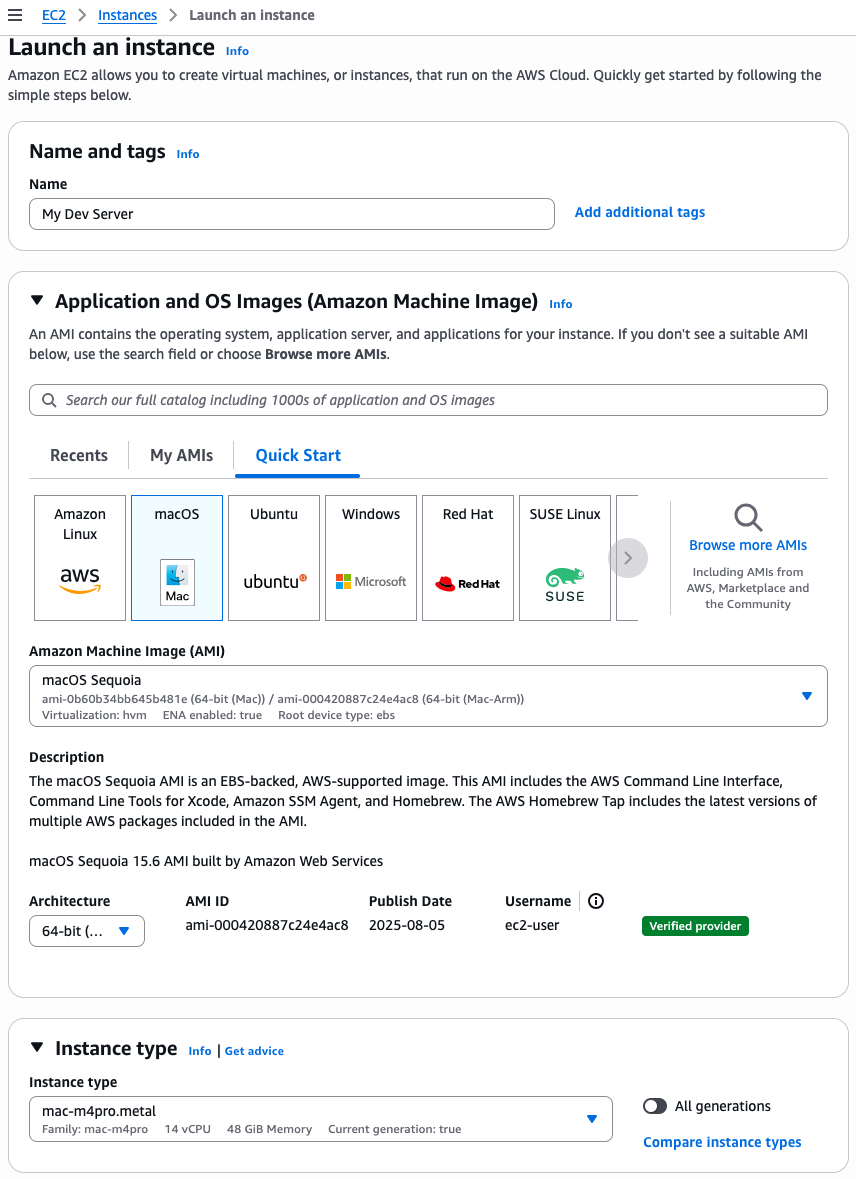
On the Launch an instance page, I enter a Name. I select a macOS Sequoia Amazon Machine Image (AMI). I make sure the Architecture is 64-bit Arm and the Instance type is mac-m4pro.metal.
The rest of the parameters arn’t specific to Amazon EC2 Mac: the network and storage configuration. When starting an instance for development use, make sure you select a volume with minimum 200 Gb or more. The default 100 Gb volume size isn’t sufficient to download and install Xcode.
 When ready, I select the Launch instance orange button on the bottom of the page. The instance will rapidly appear as Running in the console. However, it might take up to 15 minutes to allow you to connect over SSH.
Alternatively, I can use this command:
aws ec2 run-instances \ --image-id "ami-000420887c24e4ac8" \ # AMI ID depends on the region ! --instance-type "mac-m4pro.metal" \ --key-name "my-ssh-key-name" \ --network-interfaces '{"AssociatePublicIpAddress":true,"DeviceIndex":0,"Groups":["sg-0c2f1a3e01b84f3a3"]}' \ # Security Group ID depends on your config --tag-specifications '{"ResourceType":"instance","Tags":[{"Key":"Name","Value":"My Dev Server"}]}' \ --placement '{"HostId":"h-0e984064522b4b60b","Tenancy":"host"}' \ # Host ID depends on your config --private-dns-name-options '{"HostnameType":"ip-name","EnableResourceNameDnsARecord":true,"EnableResourceNameDnsAAAARecord":false}' \ --count "1" Install Xcode from the Terminal
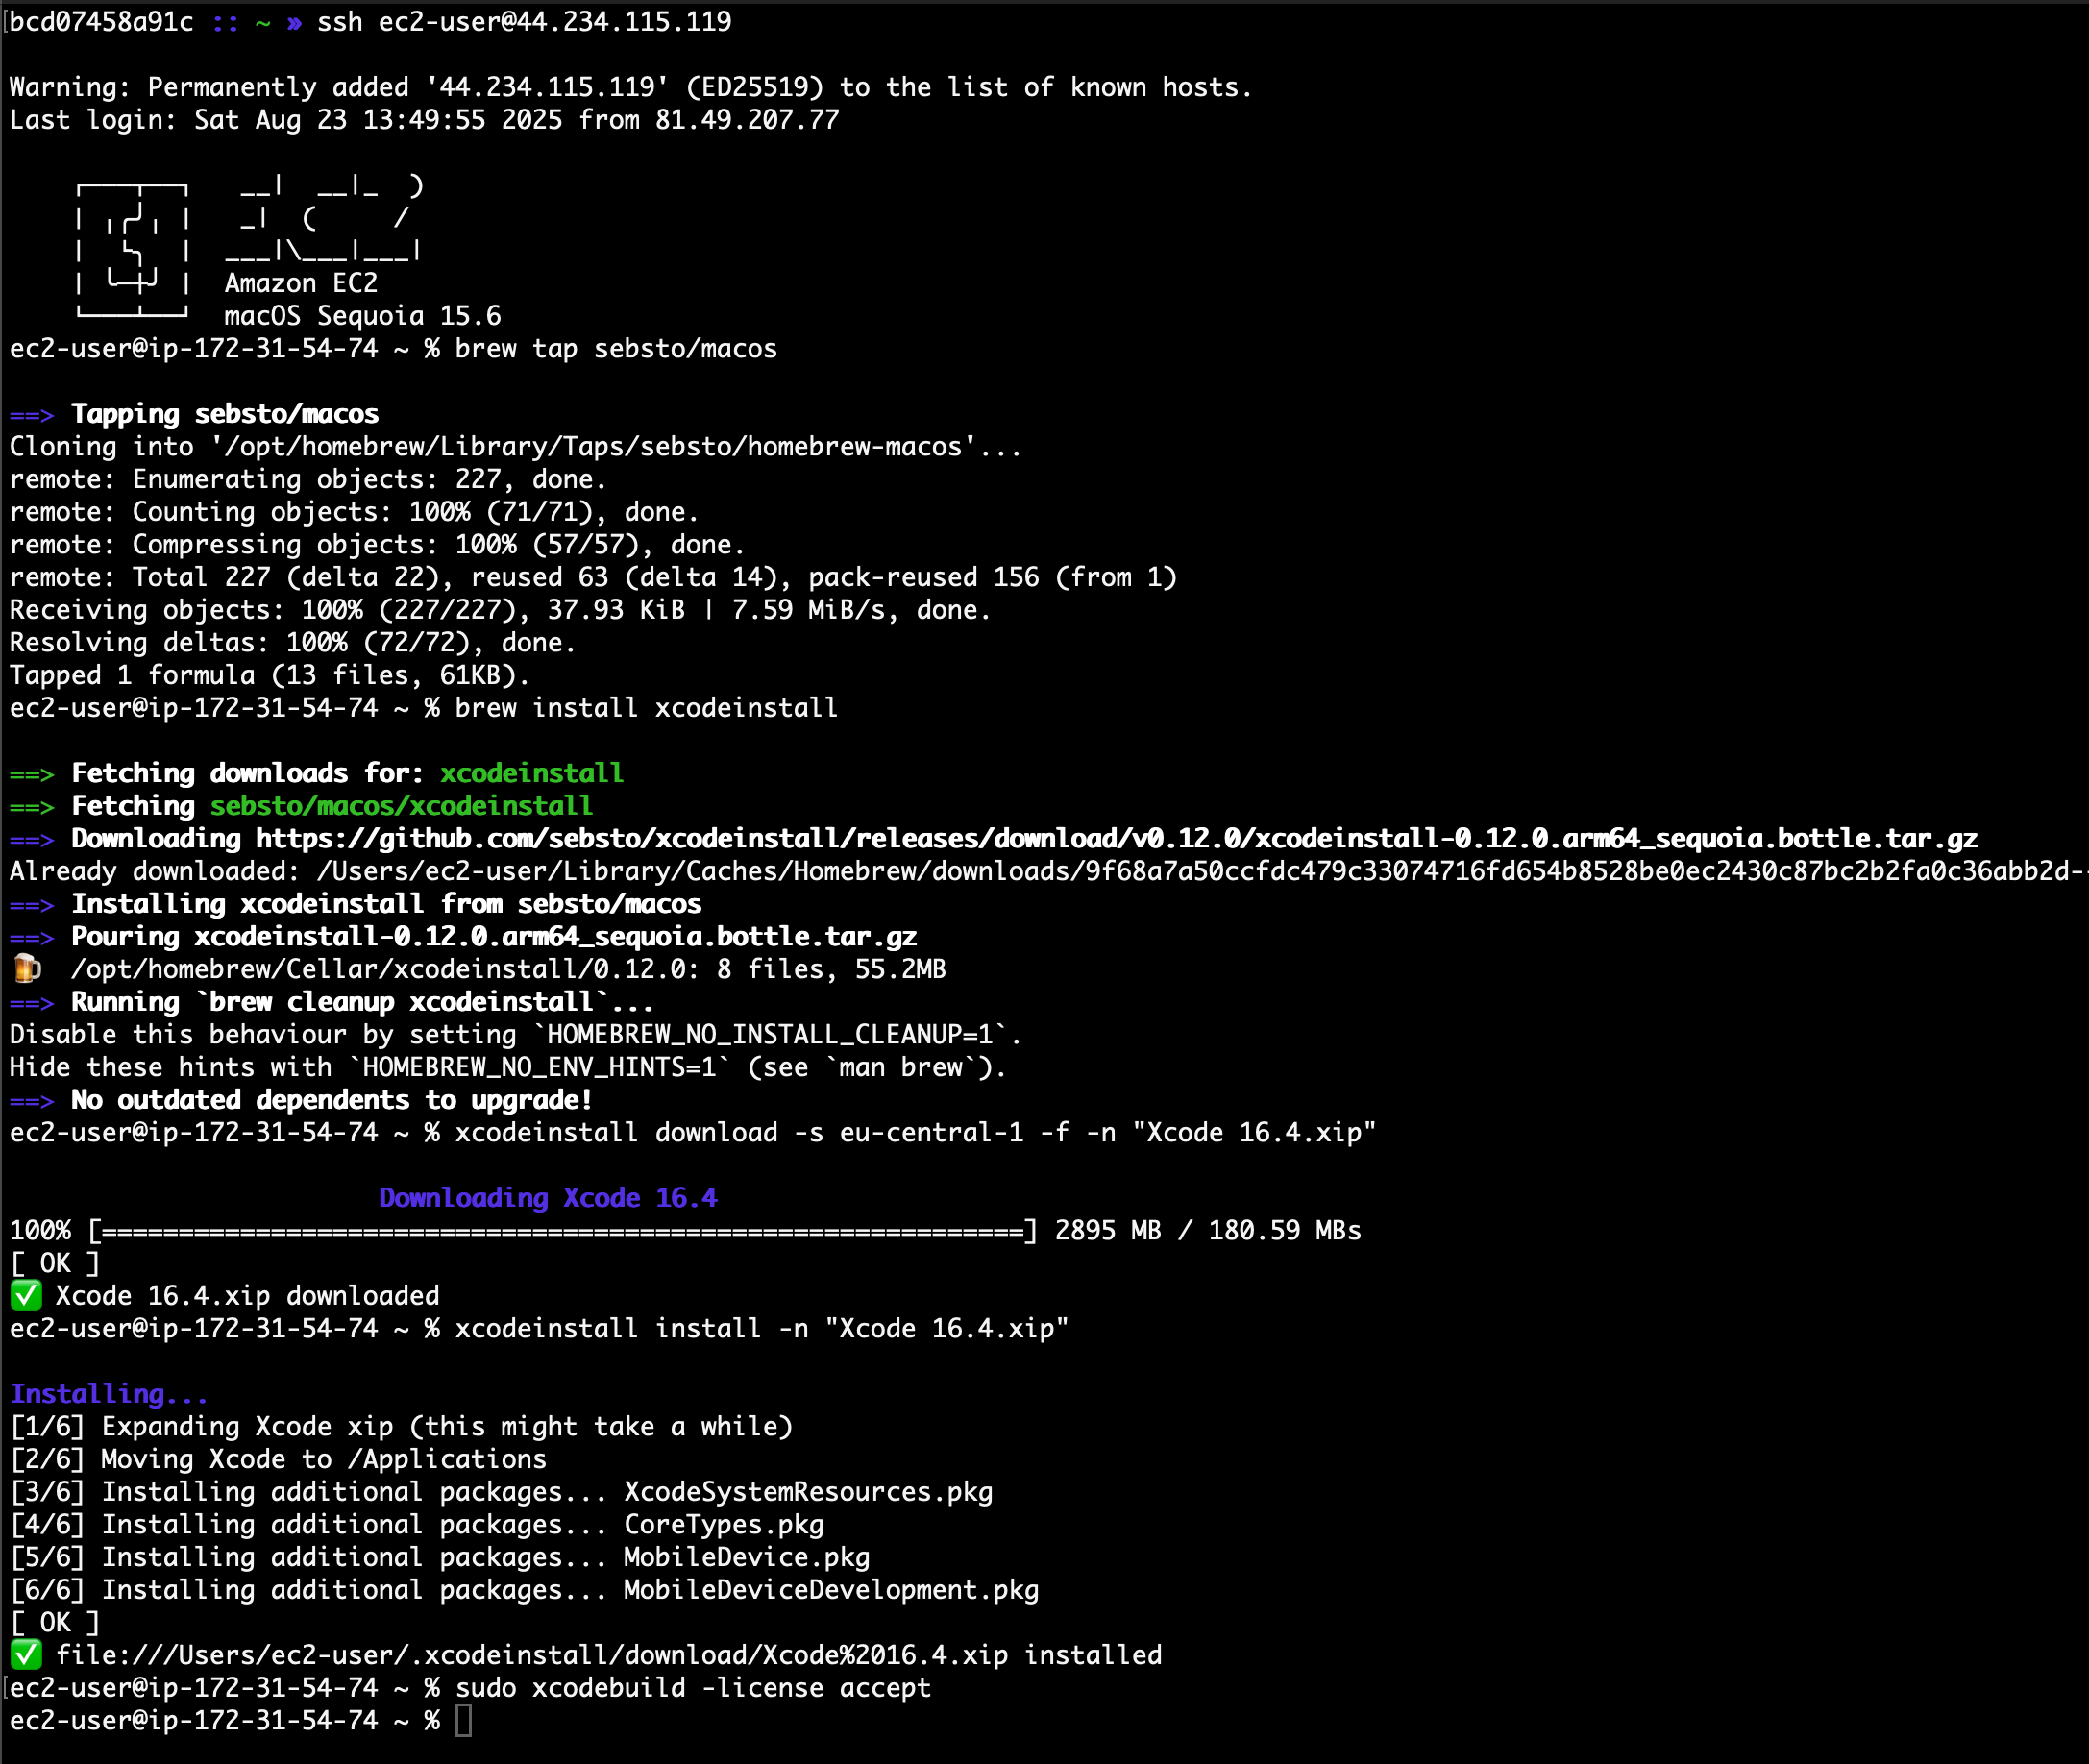
After the instance is reachable, I can connect using SSH to it and install my development tools. I use xcodeinstall to download and install Xcode 16.4.
From my laptop, I open a session with my Apple developer credentials:
# on my laptop, with permissions to access AWS Secret Manager» xcodeinstall authenticate -s eu-central-1 Retrieving Apple Developer Portal credentials...Authenticating...🔐 Two factors authentication is enabled, enter your 2FA code: 067785✅ Authenticated with MFA.
I connect to the EC2 Mac instance I just launched. Then, I download and install Xcode:
» ssh ec2-user@44.234.115.119 Warning: Permanently added '44.234.115.119' (ED25519) to the list of known hosts.Last login: Sat Aug 23 13:49:55 2025 from 81.49.207.77 ┌───┬──┐ __| __|_ ) │ ╷╭╯╷ │ _| ( / │ └╮ │ ___|\___|___| │ ╰─┼╯ │ Amazon EC2 └───┴──┘ macOS Sequoia 15.6ec2-user@ip-172-31-54-74 ~ % brew tap sebsto/macos==> Tapping sebsto/macosCloning into '/opt/homebrew/Library/Taps/sebsto/homebrew-macos'...remote: Enumerating objects: 227, done.remote: Counting objects: 100% (71/71), done.remote: Compressing objects: 100% (57/57), done.remote: Total 227 (delta 22), reused 63 (delta 14), pack-reused 156 (from 1)Receiving objects: 100% (227/227), 37.93 KiB | 7.59 MiB/s, done.Resolving deltas: 100% (72/72), done.Tapped 1 formula (13 files, 61KB).ec2-user@ip-172-31-54-74 ~ % brew install xcodeinstall ==> Fetching downloads for: xcodeinstall==> Fetching sebsto/macos/xcodeinstall==> Downloading https://github.com/sebsto/xcodeinstall/releases/download/v0.12.0/xcodeinstall-0.12.0.arm64_sequoia.bottle.tar.gzAlready downloaded: /Users/ec2-user/Library/Caches/Homebrew/downloads/9f68a7a50ccfdc479c33074716fd654b8528be0ec2430c87bc2b2fa0c36abb2d--xcodeinstall-0.12.0.arm64_sequoia.bottle.tar.gz==> Installing xcodeinstall from sebsto/macos==> Pouring xcodeinstall-0.12.0.arm64_sequoia.bottle.tar.gz🍺 /opt/homebrew/Cellar/xcodeinstall/0.12.0: 8 files, 55.2MB==> Running `brew cleanup xcodeinstall`...Disable this behaviour by setting `HOMEBREW_NO_INSTALL_CLEANUP=1`.Hide these hints with `HOMEBREW_NO_ENV_HINTS=1` (see `man brew`).==> No outdated dependents to upgrade!ec2-user@ip-172-31-54-74 ~ % xcodeinstall download -s eu-central-1 -f -n "Xcode 16.4.xip" Downloading Xcode 16.4100% [============================================================] 2895 MB / 180.59 MBs[ OK ]✅ Xcode 16.4.xip downloadedec2-user@ip-172-31-54-74 ~ % xcodeinstall install -n "Xcode 16.4.xip"Installing...[1/6] Expanding Xcode xip (this might take a while)[2/6] Moving Xcode to /Applications[3/6] Installing additional packages... XcodeSystemResources.pkg[4/6] Installing additional packages... CoreTypes.pkg[5/6] Installing additional packages... MobileDevice.pkg[6/6] Installing additional packages... MobileDeviceDevelopment.pkg[ OK ]✅ file:///Users/ec2-user/.xcodeinstall/download/Xcode%2016.4.xip installedec2-user@ip-172-31-54-74 ~ % sudo xcodebuild -license acceptec2-user@ip-172-31-54-74 ~ %
Things to know
Select an EBS volume with minimum 200 Gb for development purposes. The 100 Gb default volume size is not sufficient to install Xcode. I usually select 500 Gb. When you increase the EBS volume size after the launch of the instance, remember to resize the APFS filesystem.
Alternatively, you can choose to install your development tools and framework on the low-latency local 2 Tb SSD drive available in the Mac mini. Pay attention that the content of that volume is bound to the instance lifecycle, not the dedicated host. This means that everything will be deleted from the internal SSD storage when you stop and restart the instance.
Themac-m4.metal and mac-m4pro.metal instances support macOS Sequoia 15.6 and later.
You can migrate your existing EC2 Mac instances when the migrated instance runs macOS 15 (Sequoia). Create a custom AMI from your existing instance and start an M4 or M4 Pro instance from this AMI.
Finally, I suggest checking the tutorials I wrote to help you to get started with Amazon EC2 Mac:
- Start an Amazon EC2 Mac instanceConnect to an Amazon EC2 Mac instance (I show you three different methods to connect)Build your applications faster with a CI/CD pipeline on Amazon EC2 Mac
Pricing and availability
EC2 M4 and M4 Pro Mac instances are currently available in US East (N. Virginia) and US West (Oregon), with additional Regions planned for the future.
Amazon EC2 Mac instances are available for purchase as Dedicated Hosts through the On-Demand and Savings Plans pricing models. Billing for EC2 Mac instances is per second with a 24-hour minimum allocation period to comply with the Apple macOS Software License Agreement. At the end of the 24-hour minimum allocation period, the host can be released at any time with no further commitment
As someone who works closely with Apple developers, I’m curious to see how you’ll use these new instances to accelerate your development cycles. The combination of increased performance, enhanced memory capacity, and integration with AWS services opens new possibilities for teams building applications for iOS, macOS, iPadOS, tvOS, watchOS, and visionOS platforms. Beyond application development, Apple silicon’s Neural Engine makes these instances cost-effective candidates for running machine learning (ML) inference workloads. I’ll be discussing this topic in detail at AWS re:Invent 2025, where I’ll share benchmarks and best practices for optimizing ML workloads on EC2 Mac instances.
To learn more about EC2 M4 and M4 Pro Mac instances, visit the Amazon EC2 Mac Instances page or refer to the EC2 Mac documentation. You can start using these instances today to modernize your Apple development workflows on AWS.
— seb